Let’s face it – getting your content noticed online can be tough. But what if you could make it easy for your visitors to share your posts across social media with just a click? That’s where the right social media plugins for WordPress come in. These tools don’t just add share buttons; they help you turn your website into a social hub, boosting engagement and expanding your reach effortlessly.
Whether you want to connect your site with platforms like Facebook, X (formerly Twitter), and Instagram, or need an all-in-one solution for social sharing and following, choosing the best WordPress social media plugins can make a world of difference. In this post, we’re looking into the top plugins that can help you maximize social interaction on your WordPress site, making it more shareable, more engaging, and ultimately more successful.
For those who want more flexibility in adding social share icons to their website, this plugin is an excellent choice. It supports a wide range of social media platforms and gives you control over the placement of icons-before or after posts, in sidebars, or even as floating buttons. You can choose from 16 different design styles and add animations or pop-ups to make the buttons more engaging. The plugin also includes share counts and allows you to reorder the icons to fit your preferences.
The free version comes with all the essential features, while the premium version unlocks additional options like themed designs, mobile-optimized displays, and more advanced pop-up and lightbox features. You can also integrate email subscriptions, allowing visitors to easily subscribe to your site. Whether you stick with the free version or upgrade, this plugin provides a robust solution for social sharing.
If you want to showcase Instagram photos on your WordPress site, this plugin makes it simple. It allows you to display posts from one or multiple Instagram accounts in a fully responsive feed that looks great on any device. Customization is easy, with options to control the size, layout, and style of your feed. You can also add multiple feeds across different pages of your site, each with its own unique look and feel.
Beyond displaying photos, this plugin helps boost social engagement by encouraging visitors to follow your Instagram account directly from your website. It’s also a time-saver, automatically updating your site with new Instagram posts. The Pro version offers even more features, like hashtag feeds, carousels, and shoppable posts, making it a powerful tool for integrating Instagram into your WordPress site.
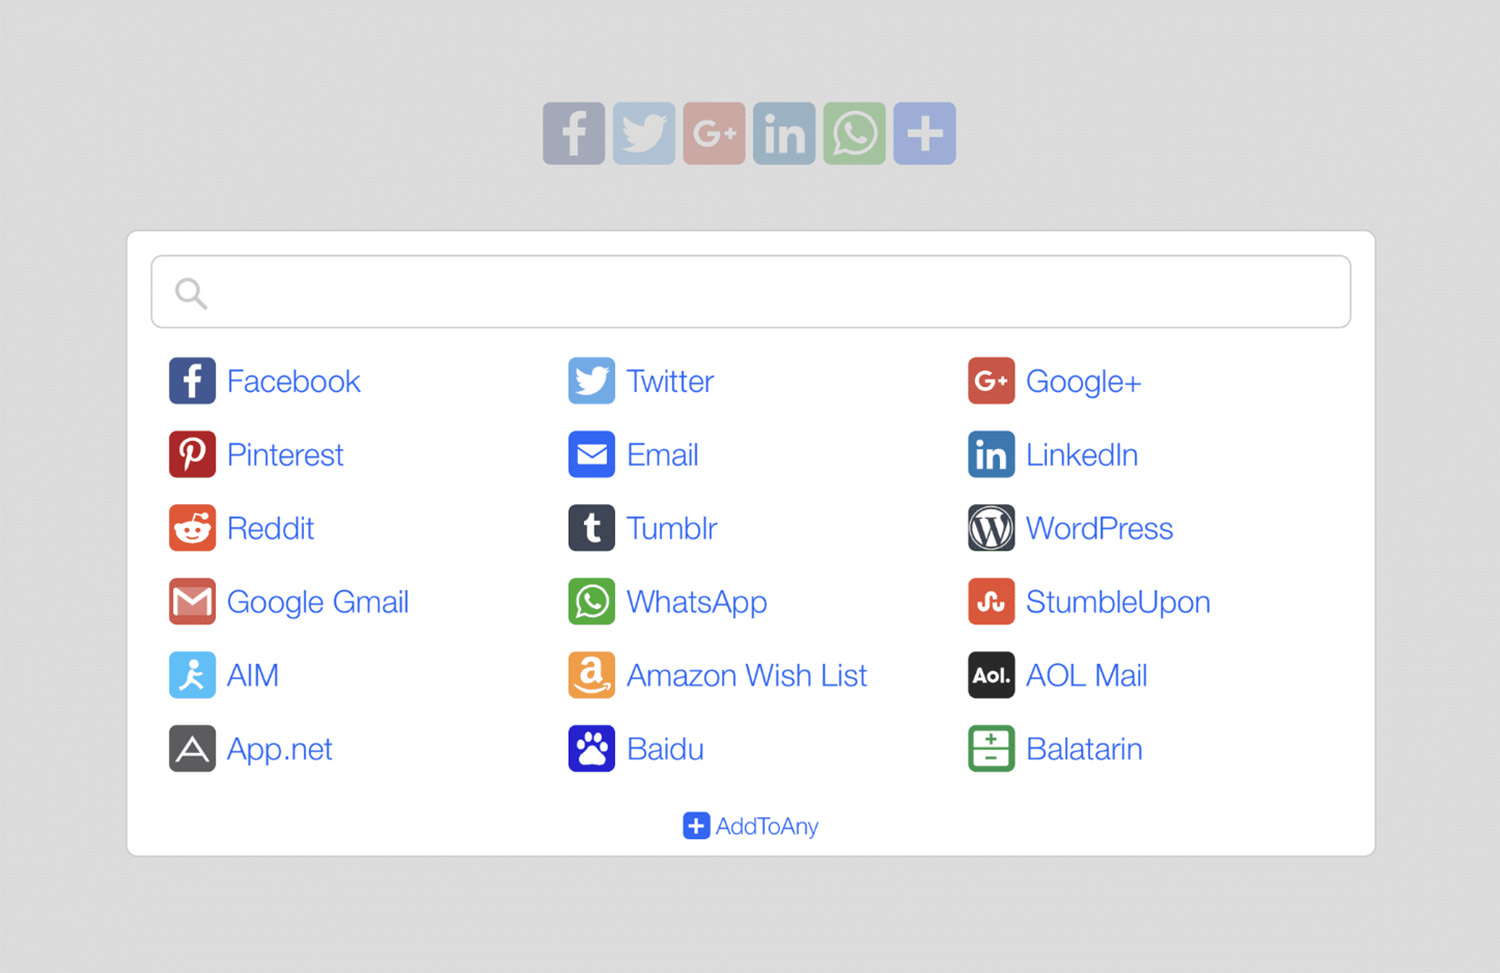
Enhancing your site’s social sharing capabilities is easy with AddToAny. This plugin offers versatile sharing options, allowing visitors to share your content across a wide range of platforms, including Facebook, Pinterest, LinkedIn, and WhatsApp. You can choose between standard and floating share buttons, customize their appearance, and even add follow buttons to connect with your social media profiles. The plugin also supports fast and official share counts to help you track engagement.
What’s great about AddToAny is its flexibility. It integrates seamlessly with Google Analytics for tracking shares and supports URL shorteners like Bitly. The plugin is optimized for performance, loading asynchronously to keep your site fast, and it works well with a variety of themes, WooCommerce, and multilingual sites. Plus, it’s mobile-ready, with sharp SVG icons and responsive design, making it a reliable choice for boosting social media interaction on your site.
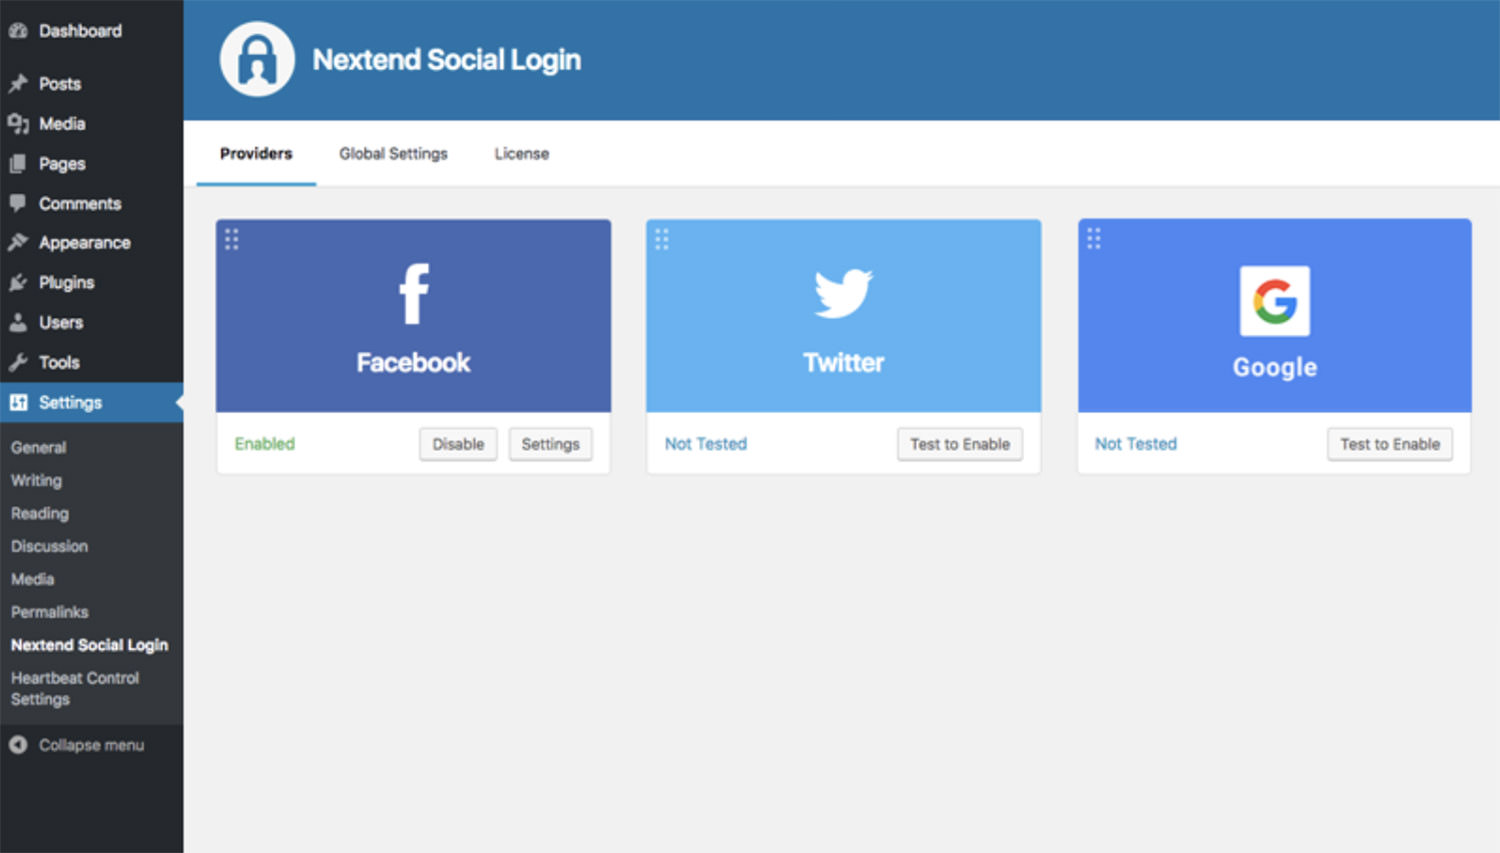
Simplify the registration and login process on your WordPress site with Nextend Social Login and Register. This plugin lets your visitors log in using their social media profiles from platforms like Facebook, Google, and X (formerly Twitter). It eliminates the need for lengthy registration forms, making it easier for users to access your site without having to remember multiple usernames and passwords. The plugin integrates smoothly with your existing WordPress login and registration forms, and users can connect multiple social accounts to a single profile.
Nextend Social Login offers plenty of features in its free version, including one-click registration, customizable redirect URLs, and the ability to use social media profile pictures as avatars. If you need more, the Pro addon expands compatibility with plugins like WooCommerce and BuddyPress and supports additional providers such as LinkedIn and Amazon. With various options for customizing user roles and login layouts, this plugin is a versatile solution for enhancing user experience on your site.
Sometimes, simplicity is key, and the Simple Share Buttons Adder plugin delivers just that. It allows you to quickly add social share buttons to your WordPress posts and pages without any hassle. The plugin offers a “Modern Share Buttons” tab, which lets you customize your buttons using CSS-based settings. This gives you control over the colors and hover effects of your buttons, allowing them to blend seamlessly with your site’s design. You can also upload and use your own custom images as share buttons for a personalized touch.
The user-friendly interface makes it easy to manage and position your share buttons exactly where you want them. Whether you’re looking to increase social engagement or just need a straightforward way to add share buttons, Simple Share Buttons Adder provides a flexible and reliable solution. For those who want more, the plugin’s dedicated website offers additional resources and customization options.
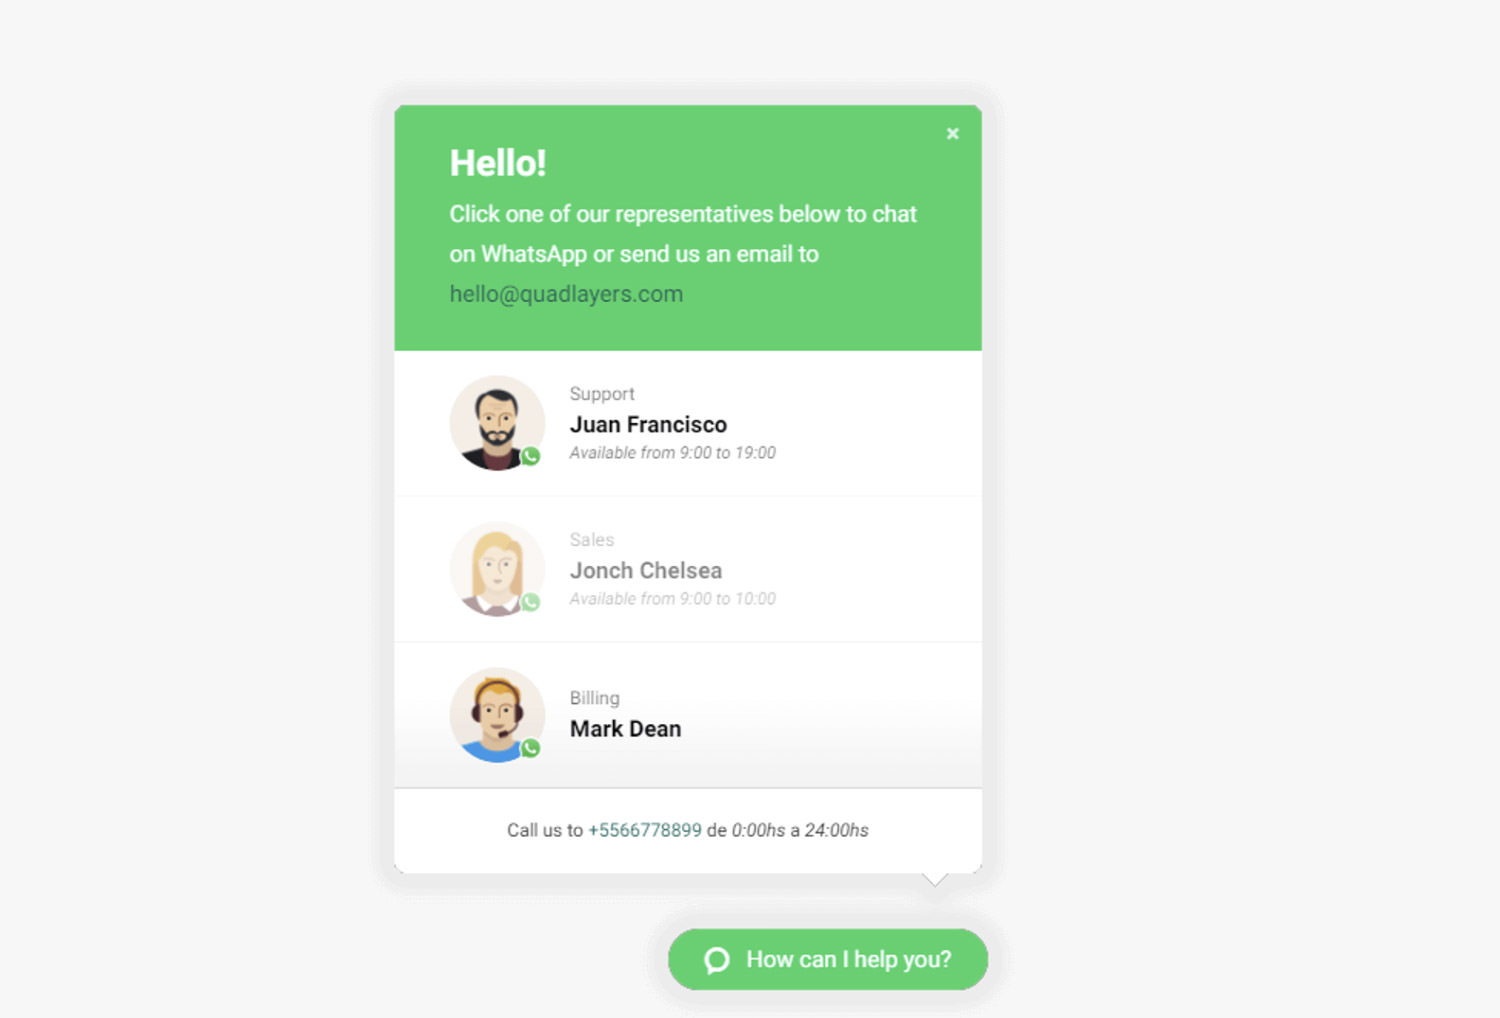
Engage your visitors directly through WhatsApp with the Social Chat plugin. This handy tool allows customers to start a conversation with you via WhatsApp or WhatsApp Business by simply clicking a button on your site. You can pre-set the first message to streamline communication, making it easier for visitors to reach out. With WhatsApp being one of the most popular messaging apps globally, this plugin can help turn casual visitors into leads by offering them a familiar and direct way to contact you.
The plugin is highly customizable, allowing you to choose different button layouts, colors, and even add a contact information box with a personalized message. For WooCommerce users, there’s a feature to add a WhatsApp button on product pages, making customer support even more accessible. The premium version expands on these features with multiple WhatsApp numbers, custom chatboxes, and integration with Google Analytics, offering a comprehensive solution for customer communication via WhatsApp.
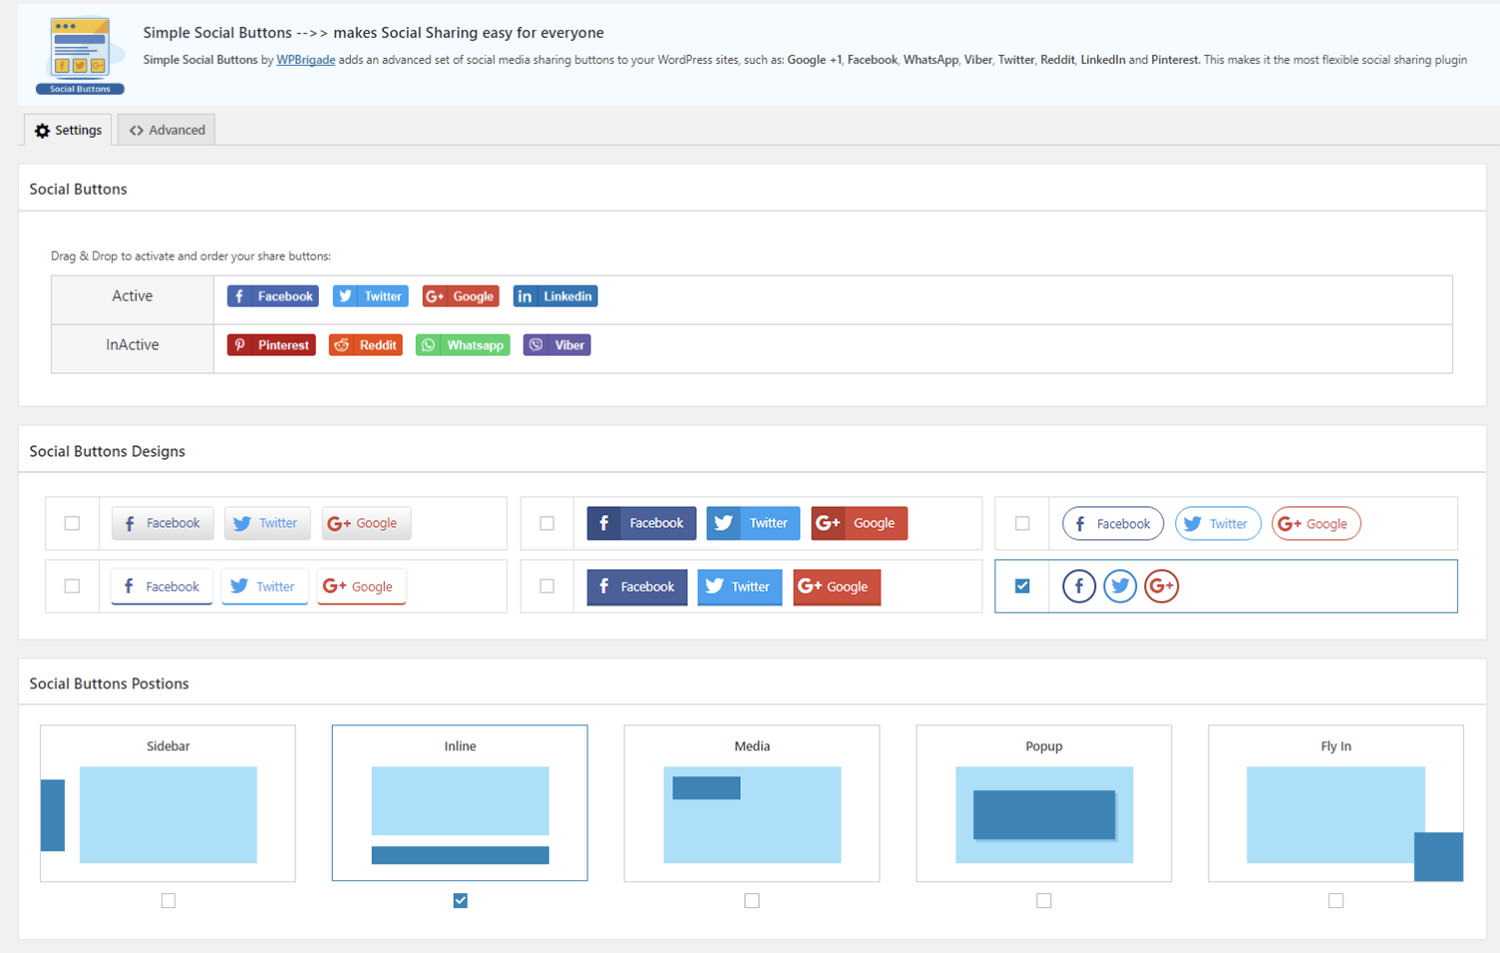
When you need a flexible and easy-to-use social sharing solution, the Simple Social Media Share Buttons plugin has you covered. It allows you to place social media buttons in various locations on your site, such as inline with your content, in sidebars, on images, or even as popups and fly-ins. With support for popular platforms like Facebook, WhatsApp, Twitter, LinkedIn, and Pinterest, this plugin ensures your content is easily shareable across the most important social networks.
The plugin is fully customizable, offering options to hide buttons on mobile devices, display share counts, and apply animations to grab your visitors’ attention. It’s also compatible with the NextGEN Gallery plugin, allowing you to add share buttons to your photo galleries. The premium version adds even more features, including advanced positioning, color customization, and additional display options like popups and fly-ins, making it a versatile choice for boosting social engagement on your site.
If you’re looking for a lightweight and efficient way to add social sharing and following buttons to your WordPress site, Social Media Feather is a great option. This plugin focuses on simplicity and performance, allowing you to quickly integrate social media buttons into your posts, pages, and custom post types without slowing down your site. It supports all major platforms, including Facebook, Twitter, Pinterest, LinkedIn, and more, helping you extend the reach of your content across various social networks.
One of the standout features of Social Media Feather is its full support for Retina and high-resolution displays, ensuring that your buttons look sharp and professional on any device. The plugin also offers widgets and shortcodes for greater customization, allowing you to control the appearance and placement of your social buttons. For those who want to keep things simple while still providing essential social sharing features, Social Media Feather is a reliable and effective solution.
JavaScript comes with a lot of built-in functions that allow you to carry out so many different operations. One of these built-in functions is the Math.random() method, which generates a random floating-point number that can then be manipulated into integers.
However, if you wish to generate a series of unique random numbers and create more random effects in your code, you will need to come up with a custom solution for yourself because the Math.random() method on its own cannot do that for you.
In this article, we’re going to be learning how to circumvent this issue and generate a series of unique random numbers using the Set object in JavaScript, which we can then use to create more randomized effects in our code.
Note: This article assumes that you know how to generate random numbers in JavaScript, as well as how to work with sets and arrays.
Generating a Unique Series of Random Numbers
One of the ways to generate a unique series of random numbers in JavaScript is by using Set objects. The reason why we’re making use of sets is because the elements of a set are unique. We can iteratively generate and insert random integers into sets until we get the number of integers we want.
And since sets do not allow duplicate elements, they are going to serve as a filter to remove all of the duplicate numbers that are generated and inserted into them so that we get a set of unique integers.
Here’s how we are going to approach the work:
Create a Set object.
Define how many random numbers to produce and what range of numbers to use.
Generate each random number and immediately insert the numbers into the Set until the Set is filled with a certain number of them.
The following is a quick example of how the code comes together:
function generateRandomNumbers(count, min, max) {
  // 1: Create a `Set` object
  let uniqueNumbers = new Set();
  while (uniqueNumbers.size < count) {
    // 2: Generate each random number
    uniqueNumbers.add(Math.floor(Math.random() * (max - min + 1)) + min);
  }
  // 3: Immediately insert them numbers into the Set...
  return Array.from(uniqueNumbers);
}
// ...set how many numbers to generate from a given range
console.log(generateRandomNumbers(5, 5, 10));
What the code does is create a new Set object and then generate and add the random numbers to the set until our desired number of integers has been included in the set. The reason why we’re returning an array is because they are easier to work with.
One thing to note, however, is that the number of integers you want to generate (represented by count in the code) should be less than the upper limit of your range plus one (represented by max + 1 in the code). Otherwise, the code will run forever. You can add an if statement to the code to ensure that this is always the case:
function generateRandomNumbers(count, min, max) {
  // if statement checks that `count` is less than `max + 1`
  if (count > max + 1) {
    return "count cannot be greater than the upper limit of range";
  } else {
    let uniqueNumbers = new Set();
    while (uniqueNumbers.size < count) {
      uniqueNumbers.add(Math.floor(Math.random() * (max - min + 1)) + min);
    }
    return Array.from(uniqueNumbers);
  }
}
console.log(generateRandomNumbers(5, 5, 10));
Using the Series of Unique Random Numbers as Array Indexes
It is one thing to generate a series of random numbers. It’s another thing to use them.
Being able to use a series of random numbers with arrays unlocks so many possibilities: you can use them in shuffling playlists in a music app, randomly sampling data for analysis, or, as I did, shuffling the tiles in a memory game.
Let’s take the code from the last example and work off of it to return random letters of the alphabet. First, we’ll construct an array of letters:
In the original code, the generateRandomNumbers() function is logged to the console. This time, we’ll construct a new variable that calls the function so it can be consumed by randomAlphabets:
And, when we put the generateRandomNumbers() function definition back in, we get the final code:
const englishAlphabets = [
  'A', 'B', 'C', 'D', 'E', 'F', 'G', 'H', 'I', 'J', 'K', 'L', 'M',
  'N', 'O', 'P', 'Q', 'R', 'S', 'T', 'U', 'V', 'W', 'X', 'Y', 'Z'
];
function generateRandomNumbers(count, min, max) {
  if (count > max + 1) {
    return "count cannot be greater than the upper limit of range";
  } else {
    let uniqueNumbers = new Set();
    while (uniqueNumbers.size  englishAlphabets[index]);
console.log(randomAlphabets);
So, in this example, we created a new array of alphabets by randomly selecting some letters in our englishAlphabets array.
You can pass in a count argument of englishAlphabets.length to the generateRandomNumbers function if you desire to shuffle the elements in the englishAlphabets array instead. This is what I mean:
In this article, we’ve discussed how to create randomization in JavaScript by covering how to generate a series of unique random numbers, how to use these random numbers as indexes for arrays, and also some practical applications of randomization.
The best way to learn anything in software development is by consuming content and reinforcing whatever knowledge you’ve gotten from that content by practicing. So, don’t stop here. Run the examples in this tutorial (if you haven’t done so), play around with them, come up with your own unique solutions, and also don’t forget to share your good work. Ciao!
Modern JavaScript regular expressions have come a long way compared to what you might be familiar with. Regexes can be an amazing tool for searching and replacing text, but they have a longstanding reputation (perhaps outdated, as I’ll show) for being difficult to write and understand.
This is especially true in JavaScript-land, where regexes languished for many years, comparatively underpowered compared to their more modern counterparts in PCRE, Perl, .NET, Java, Ruby, C++, and Python. Those days are over.
In this article, I’ll recount the history of improvements to JavaScript regexes (spoiler: ES2018 and ES2024 changed the game), show examples of modern regex features in action, introduce you to a lightweight JavaScript library that makes JavaScript stand alongside or surpass other modern regex flavors, and end with a preview of active proposals that will continue to improve regexes in future versions of JavaScript (with some of them already working in your browser today).
The History of Regular Expressions in JavaScript
ECMAScript 3, standardized in 1999, introduced Perl-inspired regular expressions to the JavaScript language. Although it got enough things right to make regexes pretty useful (and mostly compatible with other Perl-inspired flavors), there were some big omissions, even then. And while JavaScript waited 10 years for its next standardized version with ES5, other programming languages and regex implementations added useful new features that made their regexes more powerful and readable.
But that was then.
Did you know that nearly every new version of JavaScript has made at least minor improvements to regular expressions?
Let’s take a look at them.
Don’t worry if it’s hard to understand what some of the following features mean — we’ll look more closely at several of the key features afterward.
ES5 (2009) fixed unintuitive behavior by creating a new object every time regex literals are evaluated and allowed regex literals to use unescaped forward slashes within character classes (/[/]/).
ES6/ES2015 added two new regex flags: y (sticky), which made it easier to use regexes in parsers, and u (unicode), which added several significant Unicode-related improvements along with strict errors. It also added the RegExp.prototype.flags getter, support for subclassing RegExp, and the ability to copy a regex while changing its flags.
ES2018 was the edition that finally made JavaScript regexes pretty good. It added the s (dotAll) flag, lookbehind, named capture, and Unicode properties (via p{...} and P{...}, which require ES6’s flag u). All of these are extremely useful features, as we’ll see.
ES2020 added the string method matchAll, which we’ll also see more of shortly.
ES2022 added flag d (hasIndices), which provides start and end indices for matched substrings.
And finally, ES2024 added flag v (unicodeSets) as an upgrade to ES6’s flag u. The v flag adds a set of multicharacter “properties of strings” to p{...}, multicharacter elements within character classes via p{...} and q{...}, nested character classes, set subtraction [A--B] and intersection [A&&B], and different escaping rules within character classes. It also fixed case-insensitive matching for Unicode properties within negated sets [^...].
As for whether you can safely use these features in your code today, the answer is yes! The latest of these features, flag v, is supported in Node.js 20 and 2023-era browsers. The rest are supported in 2021-era browsers or earlier.
Each edition from ES2019 to ES2023 also added additional Unicode properties that can be used via p{...} and P{...}. And to be a completionist, ES2021 added string method replaceAll — although, when given a regex, the only difference from ES3’s replace is that it throws if not using flag g.
Aside: What Makes a Regex Flavor Good?
With all of these changes, how do JavaScript regular expressions now stack up against other flavors? There are multiple ways to think about this, but here are a few key aspects:
Performance.
This is an important aspect but probably not the main one since mature regex implementations are generally pretty fast. JavaScript is strong on regex performance (at least considering V8’s Irregexp engine, used by Node.js, Chromium-based browsers, and even Firefox; and JavaScriptCore, used by Safari), but it uses a backtracking engine that is missing any syntax for backtracking control — a major limitation that makes ReDoS vulnerability more common.
Support for advanced features that handle common or important use cases.
Here, JavaScript stepped up its game with ES2018 and ES2024. JavaScript is now best in class for some features like lookbehind (with its infinite-length support) and Unicode properties (with multicharacter “properties of strings,” set subtraction and intersection, and script extensions). These features are either not supported or not as robust in many other flavors.
Ability to write readable and maintainable patterns.
Here, native JavaScript has long been the worst of the major flavors since it lacks the x (“extended”) flag that allows insignificant whitespace and comments. Additionally, it lacks regex subroutines and subroutine definition groups (from PCRE and Perl), a powerful set of features that enable writing grammatical regexes that build up complex patterns via composition.
So, it’s a bit of a mixed bag.
JavaScript regexes have become exceptionally powerful, but they’re still missing key features that could make regexes safer, more readable, and more maintainable (all of which hold some people back from using this power).
“
The good news is that all of these holes can be filled by a JavaScript library, which we’ll see later in this article.
Using JavaScript’s Modern Regex Features
Let’s look at a few of the more useful modern regex features that you might be less familiar with. You should know in advance that this is a moderately advanced guide. If you’re relatively new to regex, here are some excellent tutorials you might want to start with:
RegexLearn and RegexOne are interactive tutorials that include practice problems.
JavaScript.info’s regular expressions chapter is a detailed and JavaScript-specific guide.
Often, you want to do more than just check whether a regex matches — you want to extract substrings from the match and do something with them in your code. Named capturing groups allow you to do this in a way that makes your regexes and code more readable and self-documenting.
The following example matches a record with two date fields and captures the values:
const record = 'Admitted: 2024-01-01nReleased: 2024-01-03';
const re = /^Admitted: (?d{4}-d{2}-d{2})nReleased: (?d{4}-d{2}-d{2})$/;
const match = record.match(re);
console.log(match.groups);
/* → {
  admitted: '2024-01-01',
  released: '2024-01-03'
} */
Don’t worry — although this regex might be challenging to understand, later, we’ll look at a way to make it much more readable. The key things here are that named capturing groups use the syntax (?...), and their results are stored on the groups object of matches.
You can also use named backreferences to rematch whatever a named capturing group matched via k, and you can use the values within search and replace as follows:
// Change 'FirstName LastName' to 'LastName, FirstName'
const name = 'Shaquille Oatmeal';
name.replace(/(?w+) (?w+)/, '$, $');
// → 'Oatmeal, Shaquille'
For advanced regexers who want to use named backreferences within a replacement callback function, the groups object is provided as the last argument. Here’s a fancy example:
function fahrenheitToCelsius(str) {
  const re = /(?-?d+(.d+)?)Fb/g;
  return str.replace(re, (...args) => {
    const groups = args.at(-1);
    return Math.round((groups.degrees - 32) * 5/9) + 'C';
  });
}
fahrenheitToCelsius('98.6F');
// → '37C'
fahrenheitToCelsius('May 9 high is 40F and low is 21F');
// → 'May 9 high is 4C and low is -6C'
Lookbehind
Lookbehind (introduced in ES2018) is the complement to lookahead, which has always been supported by JavaScript regexes. Lookahead and lookbehind are assertions (similar to ^ for the start of a string or b for word boundaries) that don’t consume any characters as part of the match. Lookbehinds succeed or fail based on whether their subpattern can be found immediately before the current match position.
For example, the following regex uses a lookbehind (?<=...) to match the word “cat” (only the word “cat”) if it’s preceded by “fat ”:
const re = /(?<=fat )cat/g;
'cat, fat cat, brat cat'.replace(re, 'pigeon');
// → 'cat, fat pigeon, brat cat'
You can also use negative lookbehind — written as (?<!...) — to invert the assertion. That would make the regex match any instance of “cat” that’s not preceded by “fat ”.
const re = /(?<!fat )cat/g;
'cat, fat cat, brat cat'.replace(re, 'pigeon');
// → 'pigeon, fat cat, brat pigeon'
JavaScript’s implementation of lookbehind is one of the very best (matched only by .NET). Whereas other regex flavors have inconsistent and complex rules for when and whether they allow variable-length patterns inside lookbehind, JavaScript allows you to look behind for any subpattern.
The matchAll Method
JavaScript’s String.prototype.matchAll was added in ES2020 and makes it easier to operate on regex matches in a loop when you need extended match details. Although other solutions were possible before, matchAll is often easier, and it avoids gotchas, such as the need to guard against infinite loops when looping over the results of regexes that might return zero-length matches.
Since matchAll returns an iterator (rather than an array), it’s easy to use it in a for...of loop.
const re = /(?w)(?w)/g;
for (const match of str.matchAll(re)) {
  const {char1, char2} = match.groups;
  // Print each complete match and matched subpatterns
  console.log(`Matched "${match[0]}" with "${char1}" and "${char2}"`);
}
Note: matchAll requires its regexes to use flag g (global). Also, as with other iterators, you can get all of its results as an array using Array.from or array spreading.
const matches = [...str.matchAll(/./g)];
Unicode Properties
Unicode properties (added in ES2018) give you powerful control over multilingual text, using the syntax p{...} and its negated version P{...}. There are hundreds of different properties you can match, which cover a wide variety of Unicode categories, scripts, script extensions, and binary properties.
Unicode properties require using the flag u (unicode) or v (unicodeSets).
Flag v
Flag v (unicodeSets) was added in ES2024 and is an upgrade to flag u — you can’t use both at the same time. It’s a best practice to always use one of these flags to avoid silently introducing bugs via the default Unicode-unaware mode. The decision on which to use is fairly straightforward. If you’re okay with only supporting environments with flag v (Node.js 20 and 2023-era browsers), then use flag v; otherwise, use flag u.
Flag v adds support for several new regex features, with the coolest probably being set subtraction and intersection. This allows using A--B (within character classes) to match strings in A but not in B or using A&&B to match strings in both A and B. For example:
// Matches all Greek symbols except the letter 'π'
/[p{Script_Extensions=Greek}--π]/v

// Matches only Greek letters
/[p{Script_Extensions=Greek}&&p{Letter}]/v
For more details about flag v, including its other new features, check out this explainer from the Google Chrome team.
A Word on Matching Emoji
Emoji are 🤩🔥😎👌, but how emoji get encoded in text is complicated. If you’re trying to match them with a regex, it’s important to be aware that a single emoji can be composed of one or many individual Unicode code points. Many people (and libraries!) who roll their own emoji regexes miss this point (or implement it poorly) and end up with bugs.
The following details for the emoji “👩🏻🏫” (Woman Teacher: Light Skin Tone) show just how complicated emoji can be:
// Code unit length
'👩🏻🏫'.length;
// → 7
// Each astral code point (above uFFFF) is divided into high and low surrogates
// Code point length
[...'👩🏻🏫'].length;
// → 4
// These four code points are: u{1F469} u{1F3FB} u{200D} u{1F3EB}
// u{1F469} combined with u{1F3FB} is '👩🏻'
// u{200D} is a Zero-Width Joiner
// u{1F3EB} is '🏫'
// Grapheme cluster length (user-perceived characters)
[...new Intl.Segmenter().segment('👩🏻🏫')].length;
// → 1
Fortunately, JavaScript added an easy way to match any individual, complete emoji via p{RGI_Emoji}. Since this is a fancy “property of strings” that can match more than one code point at a time, it requires ES2024’s flag v.
If you want to match emojis in environments without v support, check out the excellent libraries emoji-regex and emoji-regex-xs.
Making Your Regexes More Readable, Maintainable, and Resilient
Despite the improvements to regex features over the years, native JavaScript regexes of sufficient complexity can still be outrageously hard to read and maintain.
ES2018’s named capture was a great addition that made regexes more self-documenting, and ES6’s String.raw tag allows you to avoid escaping all your backslashes when using the RegExp constructor. But for the most part, that’s it in terms of readability.
However, there’s a lightweight and high-performance JavaScript library named regex (by yours truly) that makes regexes dramatically more readable. It does this by adding key missing features from Perl-Compatible Regular Expressions (PCRE) and outputting native JavaScript regexes. You can also use it as a Babel plugin, which means that regex calls are transpiled at build time, so you get a better developer experience without users paying any runtime cost.
PCRE is a popular C library used by PHP for its regex support, and it’s available in countless other programming languages and tools.
Let’s briefly look at some of the ways the regex library, which provides a template tag named regex, can help you write complex regexes that are actually understandable and maintainable by mortals. Note that all of the new syntax described below works identically in PCRE.
Insignificant Whitespace and Comments
By default, regex allows you to freely add whitespace and line comments (starting with #) to your regexes for readability.
import {regex} from 'regex';
const date = regex`
  # Match a date in YYYY-MM-DD format
  (?  d{4}) - # Year part
  (? d{2}) - # Month part
  (?   d{2})   # Day part
`;
This is equivalent to using PCRE’s xx flag.
Subroutines and Subroutine Definition Groups
Subroutines are written as g (where name refers to a named group), and they treat the referenced group as an independent subpattern that they try to match at the current position. This enables subpattern composition and reuse, which improves readability and maintainability.
For example, the following regex matches an IPv4 address such as “192.168.12.123”:
import {regex} from 'regex';
const ipv4 = regex`b
  (? 25[0-5] | 2[0-4]d | 1dd | [1-9]?d)
  # Match the remaining 3 dot-separated bytes
  (. g){3}
b`;
You can take this even further by defining subpatterns for use by reference only via subroutine definition groups. Here’s an example that improves the regex for admittance records that we saw earlier in this article:
regex includes the v flag by default, so you never forget to turn it on. And in environments without native v, it automatically switches to flag u while applying v’s escaping rules, so your regexes are forward and backward-compatible.
It also implicitly enables the emulated flags x (insignificant whitespace and comments) and n (“named capture only” mode) by default, so you don’t have to continually opt into their superior modes. And since it’s a raw string template tag, you don’t have to escape your backslashes like with the RegExp constructor.
Atomic Groups and Possessive Quantifiers Can Prevent Catastrophic Backtracking
Atomic groups and possessive quantifiers are another powerful set of features added by the regex library. Although they’re primarily about performance and resilience against catastrophic backtracking (also known as ReDoS or “regular expression denial of service,” a serious issue where certain regexes can take forever when searching particular, not-quite-matching strings), they can also help with readability by allowing you to write simpler patterns.
There are a variety of active proposals for improving regexes in JavaScript. Below, we’ll look at the three that are well on their way to being included in future editions of the language.
Duplicate Named Capturing Groups
This is a Stage 3 (nearly finalized) proposal. Even better is that, as of recently, it works in all major browsers.
When named capturing was first introduced, it required that all (?...) captures use unique names. However, there are cases when you have multiple alternate paths through a regex, and it would simplify your code to reuse the same group names in each alternative.
For example:
/(?d{4})-dd|dd-(?d{4})/
This proposal enables exactly this, preventing a “duplicate capture group name” error with this example. Note that names must still be unique within each alternative path.
Pattern Modifiers (aka Flag Groups)
This is another Stage 3 proposal. It’s already supported in Chrome/Edge 125 and Opera 111, and it’s coming soon for Firefox. No word yet on Safari.
Pattern modifiers use (?ims:...), (?-ims:...), or (?im-s:...) to turn the flags i, m, and s on or off for only certain parts of a regex.
For example:
/hello-(?i:world)/
// Matches 'hello-WORLD' but not 'HELLO-WORLD'
Escape Regex Special Characters with RegExp.escape
This proposal recently reached Stage 3 and has been a long time coming. It isn’t yet supported in any major browsers. The proposal does what it says on the tin, providing the function RegExp.escape(str), which returns the string with all regex special characters escaped so you can match them literally.
If you need this functionality today, the most widely-used package (with more than 500 million monthly npm downloads) is escape-string-regexp, an ultra-lightweight, single-purpose utility that does minimal escaping. That’s great for most cases, but if you need assurance that your escaped string can safely be used at any arbitrary position within a regex, escape-string-regexp recommends the regex library that we’ve already looked at in this article. The regex library uses interpolation to escape embedded strings in a context-aware way.
Conclusion
So there you have it: the past, present, and future of JavaScript regular expressions.
If you want to journey even deeper into the lands of regex, check out Awesome Regex for a list of the best regex testers, tutorials, libraries, and other resources. And for a fun regex crossword puzzle, try your hand at regexle.
May your parsing be prosperous and your regexes be readable.
Internationalization, often abbreviated as i18n, is the process of designing and developing software applications in a way that they can be easily adapted to various spoken languages like English, German, French, and more without requiring substantial changes to the codebase. It involves moving away from hardcoded strings and techniques for translating text, formatting dates and numbers, and handling different character encodings, among other tasks.
Internationalization can give users the choice to access a given website or application in their native language, which can have a positive impression on them, making it crucial for reaching a global audience.
What We’re Making
In this tutorial, we’re making a website that puts these i18n pieces together using a combination of libraries and a UI framework. You’ll want to have intermediate proficiency with JavaScript, Vue, and Nuxt to follow along. Throughout this article, we will learn by examples and incrementally build a multilingual Nuxt website. Together, we will learn how to provide i18n support for different languages, lazy-load locale messages, and switch locale on runtime.
After that, we will explore features like interpolation, pluralization, and date/time translations.
And finally, we will fetch dynamic localized content from an API server using Hygraph as our API server to get localized content. If you do not have a Hygraph account please create one for free before jumping in.
As a final detail, we will use Vuetify as our UI framework, but please feel free to use another framework if you want. The final code for what we’re building is published in a GitHub repository for reference. And finally, you can also take a look at the final result in a live demo.
The nuxt-i18n Library
nuxt-i18n is a library for implementing internationalization in Nuxt.js applications, and it’s what we will be using in this tutorial. The library is built on top of Vue I18n, which, again, is the de facto standard library for implementing i18n in Vue applications.
What makes nuxt-i18n ideal for our work is that it provides the comprehensive set of features included in Vue I18n while adding more functionalities that are specific to Nuxt, like lazy loading locale messages, route generation and redirection for different locales, SEO metadata per locale, locale-specific domains, and more.
Initial Setup
Start a new Nuxt.js project and set it up with a UI framework of your choice. Again, I will be using Vue to establish the interface for this tutorial.
Let us add a basic layout for our website and set up some sample Vue templates.
First, a “Blog” page:
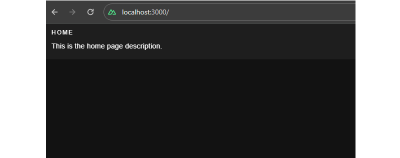
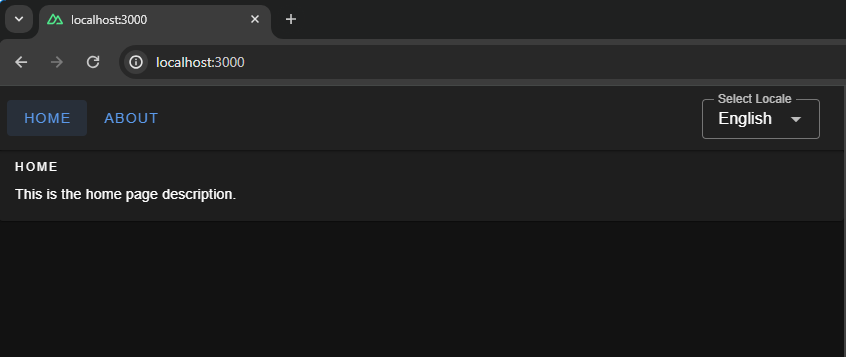
        Home


        This is the home page description
Next, an “About” page:
        About


        This is the about page description
This gives us a bit of a boilerplate that we can integrate our i18n work into.
Translating Plain Text
The page templates look good, but notice how the text is hardcoded. As far as i18n goes, hardcoded content is difficult to translate into different locales. That is where the nuxt-i18n library comes in, providing the language-specific strings we need for the Vue components in the templates.
We’ll start by installing the library via the command line:
npx nuxi@latest module add i18n
Inside the nuxt.config.ts file, we need to ensure that we have @nuxtjs/i18n inside the modules array. We can use the i18n property to provide module-specific configurations.
Since the nuxt-i18n library is built on top of the Vue I18n library, we can utilize its features in our Nuxt application as well. Let us create a new file, i18n.config.ts, which we will use to provide all vue-i18n configurations.
// i18n.config.ts
export default defineI18nConfig(() => ({
  legacy: false,
  locale: "en",
  messages: {
    en: {
      homePage: {
        title: "Home",
        description: "This is the home page description."
      },
      aboutPage: {
        title: "About",
        description: "This is the about page description."
      },
    },
  },
}));
Here, we have specified internationalization configurations, like using the en locale, and added messages for the en locale. These messages can be used inside the markup in the templates we made with the help of a $t function from Vue I18n.
Next, we need to link the i18n.config.ts configurations in our Nuxt config file.
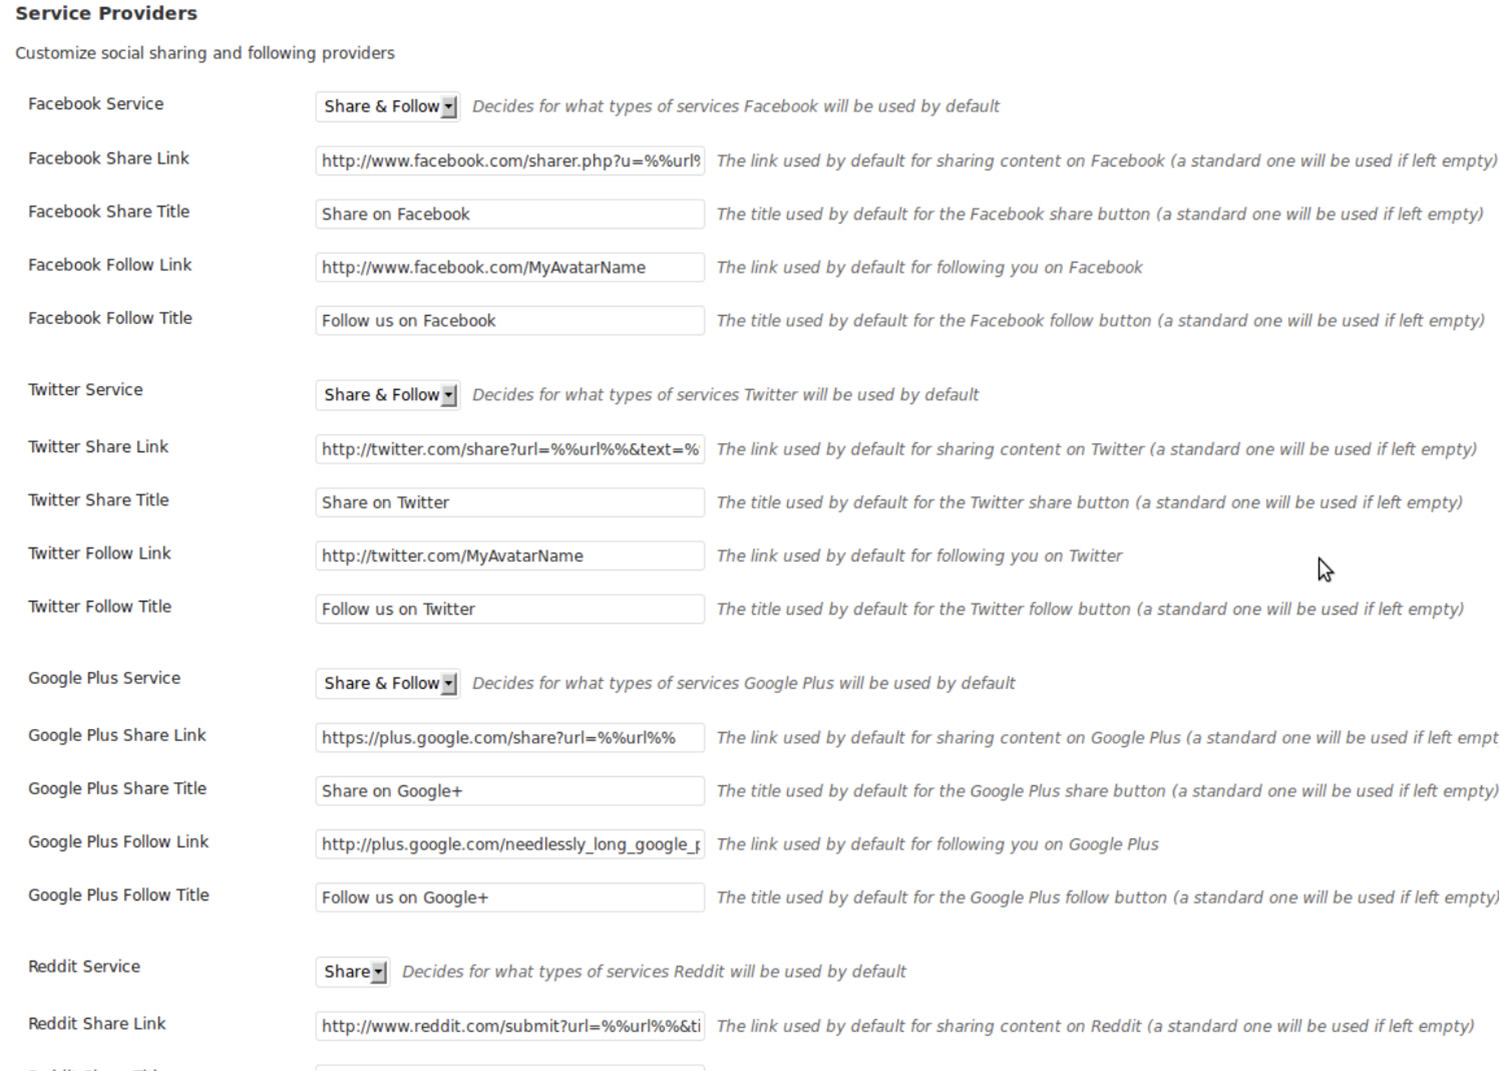
We have the title and description served from the configurations. Next, we can add more languages to the same config. For example, here’s how we can establish translations for English (en), French (fr) and Spanish (es):
For a production website with a lot of content that needs translating, it would be unwise to bundle all of the messages from different locales in the main bundle. Instead, we should use the nuxt-i18 lazy loading feature asynchronously load only the required language rather than all of them at once. Also, having messages for all locales in a single configuration file can become difficult to manage over time, and breaking them up like this makes things easier to find.
Let’s set up the lazy loading feature in nuxt.config.ts:
This enables lazy loading and specifies the locales directory that will contain our locale files. The locales array configuration specifies from which files Nuxt.js should pick up messages for a specific language.
Now, we can create individual files for each language. I’ll drop all three of them right here:
// locales/en.json
{
  "homePage": {
    "title": "Home",
    "description": "This is the home page description."
  },
  "aboutPage": {
    "title": "About",
    "description": "This is the about page description."
  },
  "selectLocale": {
    "label": "Select Locale"
  },
  "navbar": {
    "homeButton": "Home",
    "aboutButton": "About"
  }
}
// locales/fr.json
{
"homePage": {
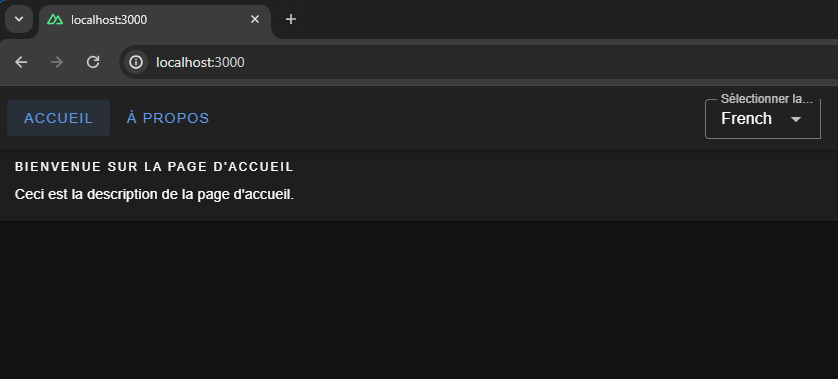
"title": "Bienvenue sur la page d'accueil",
"description": "Ceci est la description de la page d'accueil."
},
"aboutPage": {
"title": "À propos de nous",
"description": "Ceci est la description de la page à propos de nous."
},
"selectLocale": {
"label": "Sélectionner la langue"
},
"navbar": {
"homeButton": "Accueil",
"aboutButton": "À propos"
}
}
// locales/es.json
{
  "homePage": {
    "title": "Bienvenido a la página de inicio",
    "description": "Esta es la descripción de la página de inicio."
  },
  "aboutPage": {
    "title": "Sobre nosotros",
    "description": "Esta es la descripción de la página sobre nosotros."
  },
  "selectLocale": {
    "label": "Seleccione el idioma"
  },
  "navbar": {
    "homeButton": "Inicio",
    "aboutButton": "Acerca de"
  }
}
We have set up lazy loading, added multiple languages to our application, and moved our locale messages to separate files. The user gets the right locale for the right message, and the locale messages are kept in a maintainable manner inside the code base.
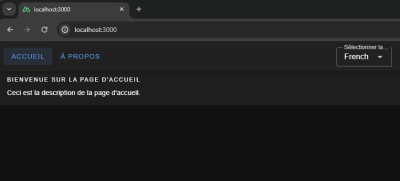
Switching Between Languages
We have different locales, but to see them in action, we will build a component that can be used to switch between the available locales.
This component uses the useI18n hook provided by the Vue I18n library and a computed property language to get and set the global locale from a input. To make this even more like a real-world website, we’ll include a small navigation bar that links up all of the website’s pages.
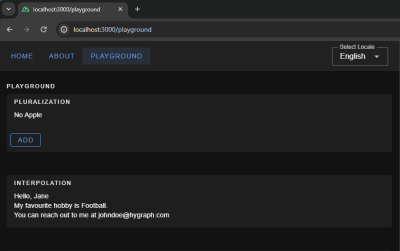
We have a basic layout, but I thought we’d take this a step further and build a playground page we can use to explore more i18n features that are pretty useful when building a multilingual website.
Interpolation and Pluralization
Interpolation and pluralization are internationalization techniques for handling dynamic content and grammatical variations across different languages. Interpolation allows developers to insert dynamic variables or expressions into translated strings. Pluralization addresses the complexities of plural forms in languages by selecting the appropriate grammatical form based on numeric values. With the help of interpolation and pluralization, we can create more natural and accurate translations.
To use pluralization in our Nuxt app, we’ll first add a configuration to the English locale file.
// locales/en.json
{
  // etc.
  "playgroundPage": {
    "pluralization": {
      "title": "Pluralization",
      "apple": "No Apple | One Apple | {count} Apples",
      "addApple": "Add"
    }
  }
  // etc.
}
The pluralization configuration set up for the key apple defines an output — No Apple — if a count of 0 is passed to it, a second output — One Apple — if a count of 1 is passed, and a third — 2 Apples, 3 Apples, and so on — if the count passed in is greater than 1.
Here is how we can use it in your component: Whenever you click on the add button, you will see pluralization in action, changing the strings.
To use interpolation in our Nuxt app, first, add a configuration in the English locale file:
// locales/en.json
{
  ...
  "playgroundPage": {
    ...
    "interpolation": {
      "title": "Interpolation",
      "sayHello": "Hello, {name}",
      "hobby": "My favourite hobby is {0}.",
      "email": "You can reach out to me at {account}{'@'}{domain}.com"
    },
    // etc.
  }
  // etc.
}
The message for sayHello expects an object passed to it having a key name when invoked — a process known as named interpolation.
The message hobby expects an array to be passed to it and will pick up the 0th element, which is known as list interpolation.
The message email expects an object with keys account, and domain and joins both with a literal string "@". This is known as literal interpolation.
Below is an example of how to use it in the Vue components:
Translating dates and times involves translating date and time formats according to the conventions of different locales. We can use Vue I18n’s features for formatting date strings, handling time zones, and translating day and month names for managing date time translations. We can give the configuration for the same using the datetimeFormats key inside the vue-i18n config object.
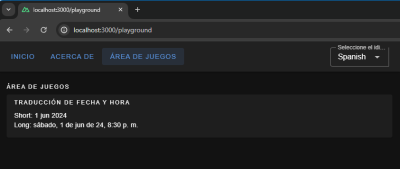
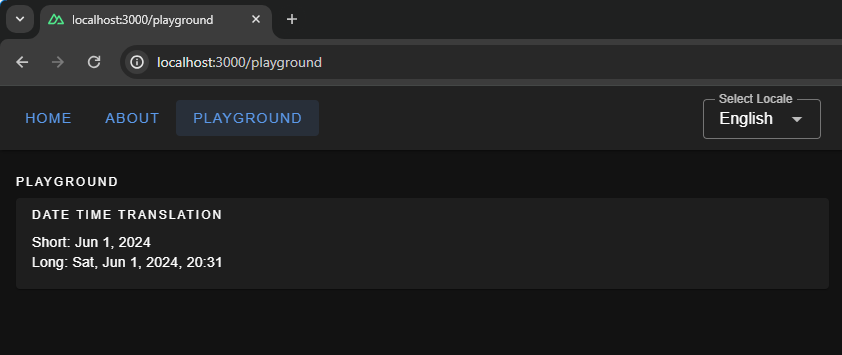
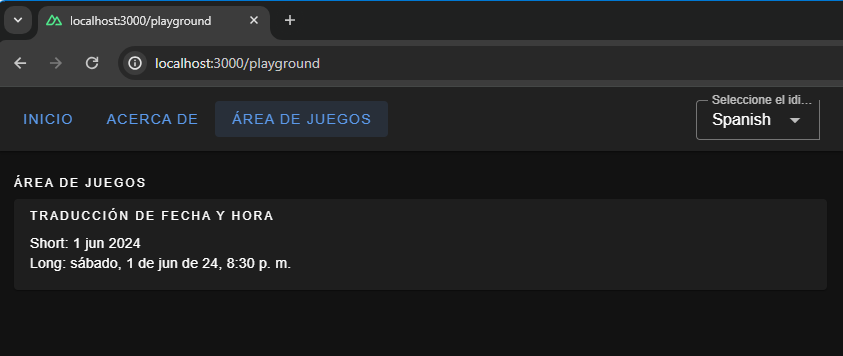
Here, we have set up short and long formats for all three languages. If you are coding along, you will be able to see available configurations for fields, like month and year, thanks to TypeScript and Intellisense features provided by your code editor. To display the translated dates and times in components, we should use the $d function and pass the format to it.
{{ $t("playgroundPage.dateTime.title") }}
Short: {{ (new Date(), $d(new Date(), "short")) }}
Showing the date and time translated in Spanish. (Large preview)
Localization On the Hygraph Side
We saw how to implement localization with static content. Now, we’ll attempt to understand how to fetch dynamic localized content in Nuxt.
We can build a blog page in our Nuxt App that fetches data from a server. The server API should accept a locale and return data in that specific locale.
Hygraph has a flexible localization API that allows you to publish and query localized content. If you haven’t created a free Hygraph account yet, you can do that on the Hygraph website to continue following along.
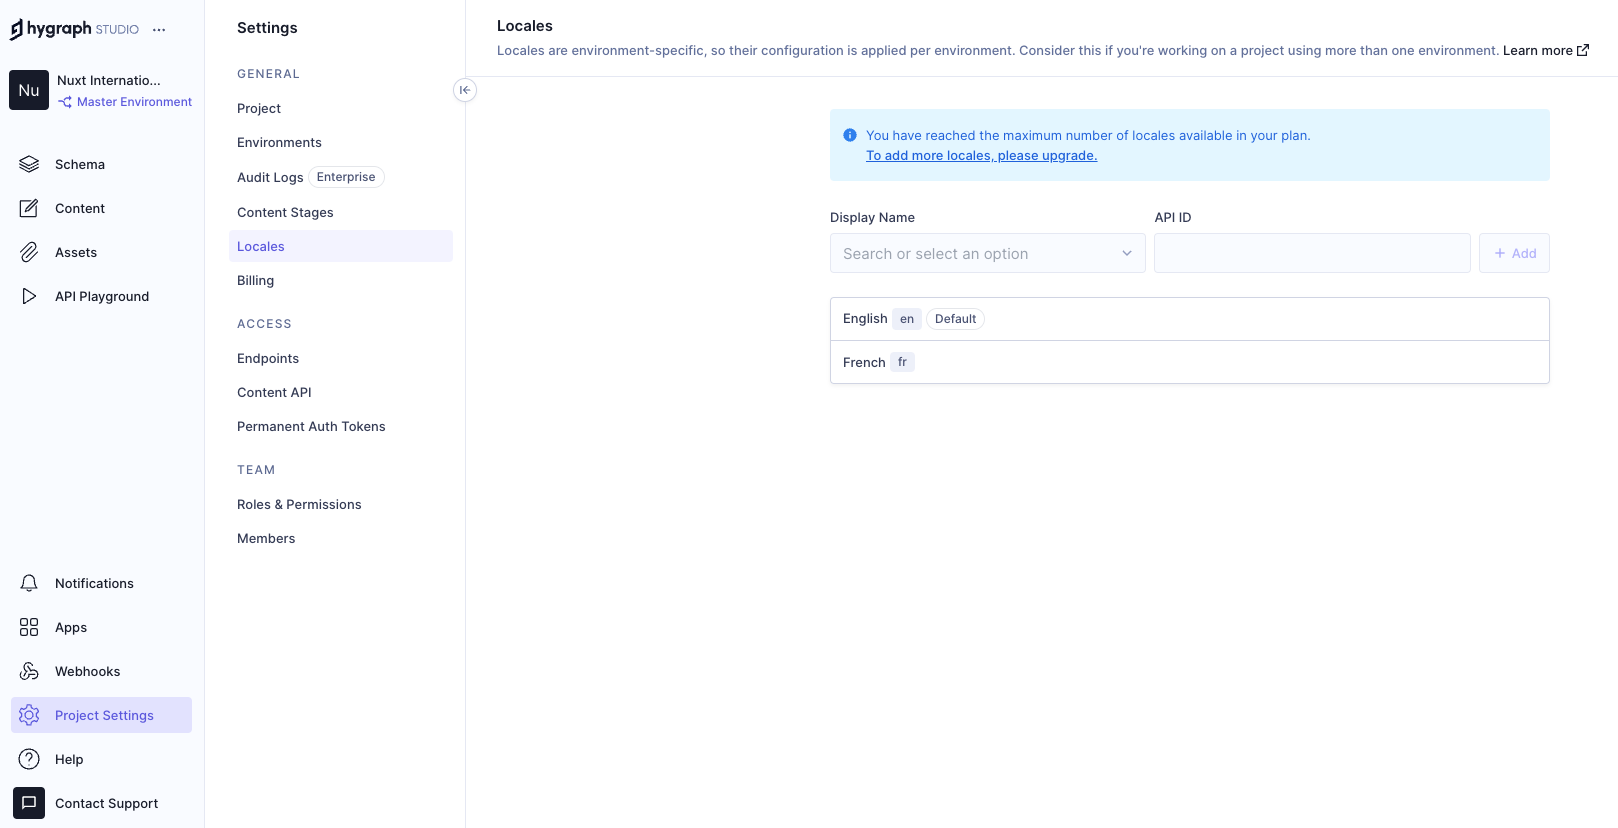
Go to Project Settings → Locales and add locales for the API.
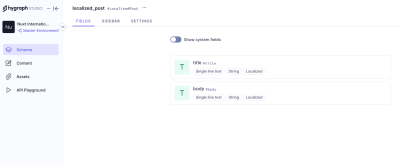
We have added two locales: English and French. Now we need aq localized_post model in our schema that only two fields: title and body. Ensure to make these “Localized” fields while creating them.
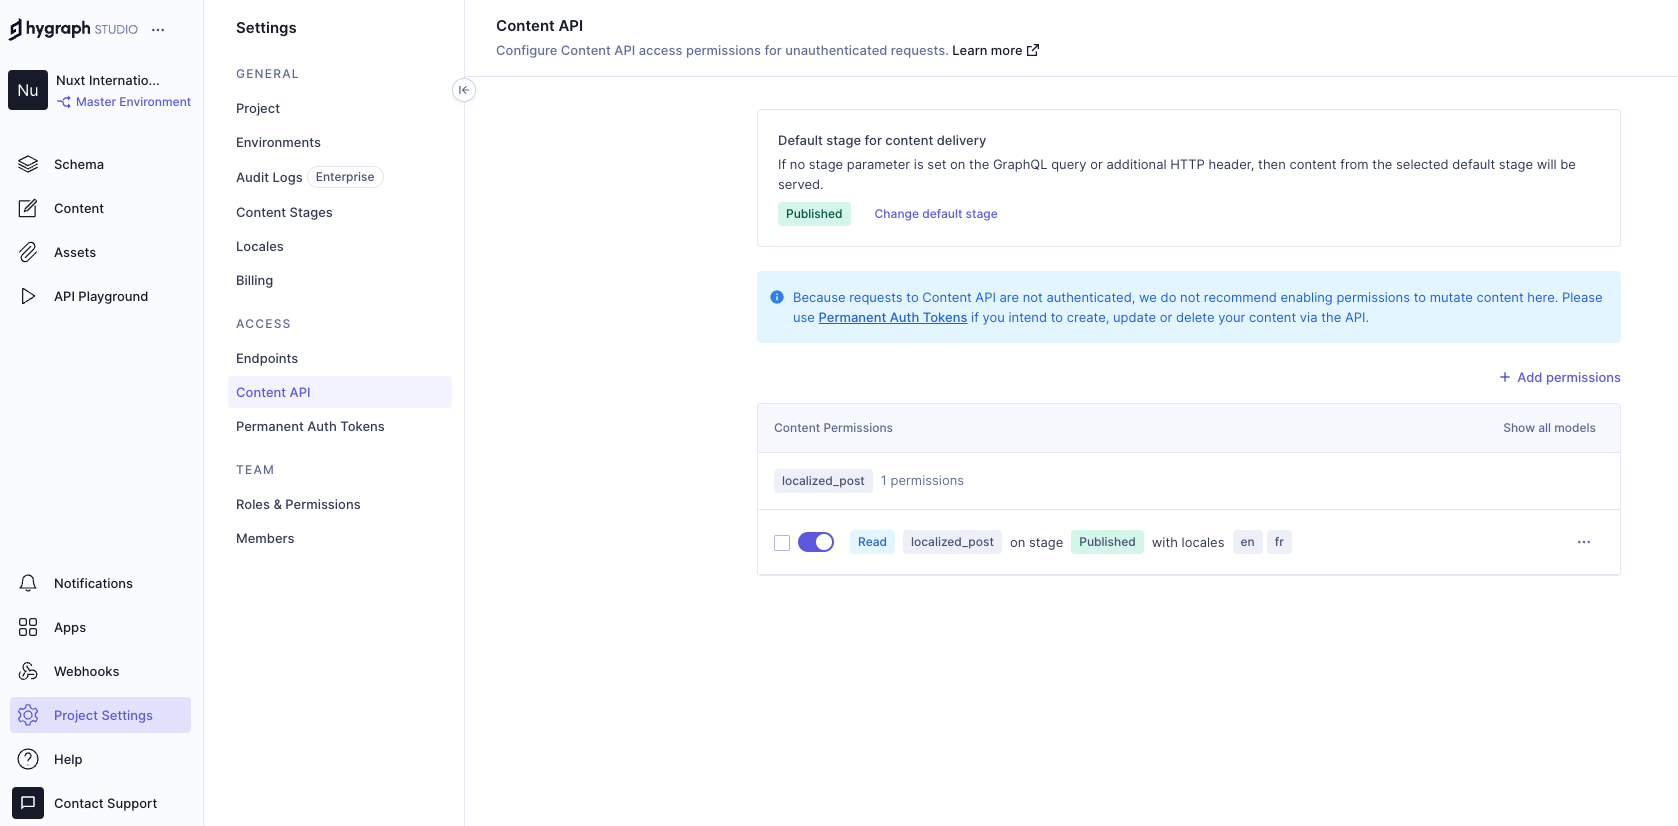
Add permissions to consume the localized content, go to Project settings → Access → API Access → Public Content API, and assign Read permissions to the localized_post model.
Now, we can go to the Hygrapgh API playground and add some localized data to the database with the help of GraphQL mutations. To limit the scope of this example, I am simply adding data from the Hygraph API playground. In an ideal world, a create/update mutation would be triggered from the front end after receiving user input.
Run this mutation in the Hygraph API playground:
mutation createLocalizedPost {
  createLocalizedPost(
    data: {
      title: "A Journey Through the Alps",
      body: "Exploring the majestic mountains of the Alps offers a thrilling experience. The stunning landscapes, diverse wildlife, and pristine environment make it a perfect destination for nature lovers.",
      localizations: {
        create: [
          {locale: fr, data: {title: "Un voyage à travers les Alpes", body: "Explorer les majestueuses montagnes des Alpes offre une expérience palpitante. Les paysages époustouflants, la faune diversifiée et l'environnement immaculé en font une destination parfaite pour les amoureux de la nature."}}
        ]
      }
    }
  ) {
    id
  }
}
The mutation above creates a post with the en locale and includes a fr version of the same post. Feel free to add more data to your model if you want to see things work from a broader set of data.
Putting Things Together
Now that we have Hygraph API content ready for consumption let’s take a moment to understand how it’s consumed inside the Nuxt app.
To do this, we’ll install nuxt-graphql-client to serve as the app’s GraphQL client. This is a minimal GraphQL client for performing GraphQL operations without having to worry about complex configurations, code generation, typing, and other setup tasks.
Next, let’s add our GraphQL queries in graphql/queries.graphql.
query getPosts($locale: [Locale!]!) {
  localizedPosts(locales: $locale) {
    title
    body
  }
}
The GraphQL client will automatically scan .graphql and .gql files and generate client-side code and typings in the .nuxt/gql folder. All we need to do is stop and restart the Nuxt application. After restarting the app, the GraphQL client will allow us to use a GqlGetPosts function to trigger the query.
Now, we will build the Blog page where by querying the Hygraph server and showing the dynamic data.
This code fetches only the current locale from the useI18n hook and sends it to the fetchPosts function when the Vue component is mounted. The fetchPosts function will pass the locale to the GraphQL query as a variable and obtain localized data from the Hygraph server. We also have a watcher on the locale so that whenever the global locale is changed by the user we make an API call to the server again and fetch posts in that locale.
And, finally, let’s add markup for viewing our fetched data!
    Blogs


      Something went wrong while getting blogs please check the logs.


          {{ post.title }}
          {{ post.body }}
Awesome! If all goes according to plan, then your app should look something like the one in the following video.
Wrapping Up
Check that out — we just made the functionality for translating content for a multilingual website! Now, a user can select a locale from a list of options, and the app fetches content for the selected locale and automatically updates the displayed content.
Did you think that translations would require more difficult steps? It’s pretty amazing that we’re able to cobble together a couple of libraries, hook them up to an API, and wire everything up to render on a page.
Of course, there are other libraries and resources for handling internationalization in a multilingual context. The exact tooling is less the point than it is seeing what pieces are needed to handle dynamic translations and how they come together.


