Creating The “Moving Highlight” Navigation Bar With JavaScript And CSS

Creating The “Moving Highlight” Navigation Bar With JavaScript And CSS

Creating The “Moving Highlight” Navigation Bar With JavaScript And CSS

Blake Lundquist

2025-06-11T13:00:00+00:00
2025-06-20T10:32:35+00:00

I recently came across an old jQuery tutorial demonstrating a “moving highlight” navigation bar and decided the concept was due for a modern upgrade. With this pattern, the border around the active navigation item animates directly from one element to another as the user clicks on menu items. In 2025, we have much better tools to manipulate the DOM via vanilla JavaScript. New features like the View Transition API make progressive enhancement more easily achievable and handle a lot of the animation minutiae.

An example of a “moving highlight” navigation bar
(Large preview)

In this tutorial, I will demonstrate two methods of creating the “moving highlight” navigation bar using plain JavaScript and CSS. The first example uses the getBoundingClientRect method to explicitly animate the border between navigation bar items when they are clicked. The second example achieves the same functionality using the new View Transition API.

The Initial Markup

Let’s assume that we have a single-page application where content changes without the page being reloaded. The starting HTML and CSS are your standard navigation bar with an additional div element containing an id of #highlight. We give the first navigation item a class of .active.

See the Pen [Moving Highlight Navbar Starting Markup [forked]](https://codepen.io/smashingmag/pen/EajQyBW) by Blake Lundquist.

See the Pen Moving Highlight Navbar Starting Markup [forked] by Blake Lundquist.

For this version, we will position the #highlight element around the element with the .active class to create a border. We can utilize absolute positioning and animate the element across the navigation bar to create the desired effect. We’ll hide it off-screen initially by adding left: -200px and include transition styles for all properties so that any changes in the position and size of the element will happen gradually.

#highlight {
  z-index: 0;
  position: absolute;
  height: 100%;
  width: 100px;
  left: -200px;
  border: 2px solid green;
  box-sizing: border-box;
  transition: all 0.2s ease;
}

Add A Boilerplate Event Handler For Click Interactions

We want the highlight element to animate when a user changes the .active navigation item. Let’s add a click event handler to the nav element, then filter for events caused only by elements matching our desired selector. In this case, we only want to change the .active nav item if the user clicks on a link that does not already have the .active class.

Initially, we can call console.log to ensure the handler fires only when expected:

const navbar = document.querySelector('nav');

navbar.addEventListener('click', function (event) {
  // return if the clicked element doesn't have the correct selector
  if (!event.target.matches('nav a:not(active)')) {
    return;
  }
  
  console.log('click');
});

Open your browser console and try clicking different items in the navigation bar. You should only see "click" being logged when you select a new item in the navigation bar.

Now that we know our event handler is working on the correct elements let’s add code to move the .active class to the navigation item that was clicked. We can use the object passed into the event handler to find the element that initialized the event and give that element a class of .active after removing it from the previously active item.

const navbar = document.querySelector('nav');

navbar.addEventListener('click', function (event) {
  // return if the clicked element doesn't have the correct selector
  if (!event.target.matches('nav a:not(active)')) {
    return;
  }
  
-  console.log('click');
+  document.querySelector('nav a.active').classList.remove('active');
+  event.target.classList.add('active');
  
});

Our #highlight element needs to move across the navigation bar and position itself around the active item. Let’s write a function to calculate a new position and width. Since the #highlight selector has transition styles applied, it will move gradually when its position changes.

Using getBoundingClientRect, we can get information about the position and size of an element. We calculate the width of the active navigation item and its offset from the left boundary of the parent element. Then, we assign styles to the highlight element so that its size and position match.

// handler for moving the highlight
const moveHighlight = () => {
  const activeNavItem = document.querySelector('a.active');
  const highlighterElement = document.querySelector('#highlight');
  
  const width = activeNavItem.offsetWidth;

  const itemPos = activeNavItem.getBoundingClientRect();
  const navbarPos = navbar.getBoundingClientRect()
  const relativePosX = itemPos.left - navbarPos.left;

  const styles = {
    left: `${relativePosX}px`,
    width: `${width}px`,
  };

  Object.assign(highlighterElement.style, styles);
}

Let’s call our new function when the click event fires:

navbar.addEventListener('click', function (event) {
  // return if the clicked element doesn't have the correct selector
  if (!event.target.matches('nav a:not(active)')) {
    return;
  }
  
  document.querySelector('nav a.active').classList.remove('active');
  event.target.classList.add('active');
  
+  moveHighlight();
});

Finally, let’s also call the function immediately so that the border moves behind our initial active item when the page first loads:

// handler for moving the highlight
const moveHighlight = () => {
 // ...
}

// display the highlight when the page loads
moveHighlight();

Now, the border moves across the navigation bar when a new item is selected. Try clicking the different navigation links to animate the navigation bar.

See the Pen [Moving Highlight Navbar [forked]](https://codepen.io/smashingmag/pen/WbvMxqV) by Blake Lundquist.

See the Pen Moving Highlight Navbar [forked] by Blake Lundquist.

That only took a few lines of vanilla JavaScript and could easily be extended to account for other interactions, like mouseover events. In the next section, we will explore refactoring this feature using the View Transition API.

Using The View Transition API

The View Transition API provides functionality to create animated transitions between website views. Under the hood, the API creates snapshots of “before” and “after” views and then handles transitioning between them. View transitions are useful for creating animations between documents, providing the native-app-like user experience featured in frameworks like Astro. However, the API also provides handlers meant for SPA-style applications. We will use it to reduce the JavaScript needed in our implementation and more easily create fallback functionality.

For this approach, we no longer need a separate #highlight element. Instead, we can style the .active navigation item directly using pseudo-selectors and let the View Transition API handle the animation between the before-and-after UI states when a new navigation item is clicked.

We’ll start by getting rid of the #highlight element and its associated CSS and replacing it with styles for the nav a::after pseudo-selector:


- #highlight {
-  z-index: 0;
-  position: absolute;
-  height: 100%;
-  width: 0;
-  left: 0;
-  box-sizing: border-box;
-  transition: all 0.2s ease;
- }

+ nav a::after {
+  content: " ";
+  position: absolute;
+  left: 0;
+  top: 0;
+  width: 100%;
+  height: 100%;
+  border: none;
+  box-sizing: border-box;
+ }

For the .active class, we include the view-transition-name property, thus unlocking the magic of the View Transition API. Once we trigger the view transition and change the location of the .active navigation item in the DOM, “before” and “after” snapshots will be taken, and the browser will animate the border across the bar. We’ll give our view transition the name of highlight, but we could theoretically give it any name.

nav a.active::after {
  border: 2px solid green;
  view-transition-name: highlight;
}

Once we have a selector that contains a view-transition-name property, the only remaining step is to trigger the transition using the startViewTransition method and pass in a callback function.

const navbar = document.querySelector('nav');

// Change the active nav item on click
navbar.addEventListener('click', async  function (event) {

  if (!event.target.matches('nav a:not(.active)')) {
    return;
  }
  
  document.startViewTransition(() => {
    document.querySelector('nav a.active').classList.remove('active');

    event.target.classList.add('active');
  });
});

Above is a revised version of the click handler. Instead of doing all the calculations for the size and position of the moving border ourselves, the View Transition API handles all of it for us. We only need to call document.startViewTransition and pass in a callback function to change the item that has the .active class!

Adjusting The View Transition

At this point, when clicking on a navigation link, you’ll notice that the transition works, but some strange sizing issues are visible.

The view transition with sizing issues
(Large preview)

This sizing inconsistency is caused by aspect ratio changes during the course of the view transition. We won’t go into detail here, but Jake Archibald has a detailed explanation you can read for more information. In short, to ensure the height of the border stays uniform throughout the transition, we need to declare an explicit height for the ::view-transition-old and ::view-transition-new pseudo-selectors representing a static snapshot of the old and new view, respectively.

::view-transition-old(highlight) {
  height: 100%;
}

::view-transition-new(highlight) {
  height: 100%;
}

Let’s do some final refactoring to tidy up our code by moving the callback to a separate function and adding a fallback for when view transitions aren’t supported:

const navbar = document.querySelector('nav');

// change the item that has the .active class applied
const setActiveElement = (elem) => {
  document.querySelector('nav a.active').classList.remove('active');
  elem.classList.add('active');
}

// Start view transition and pass in a callback on click
navbar.addEventListener('click', async  function (event) {
  if (!event.target.matches('nav a:not(.active)')) {
    return;
  }

  // Fallback for browsers that don't support View Transitions:
  if (!document.startViewTransition) {
    setActiveElement(event.target);
    return;
  }
  
  document.startViewTransition(() => setActiveElement(event.target));
});

Here’s our view transition-powered navigation bar! Observe the smooth transition when you click on the different links.

See the Pen [Moving Highlight Navbar with View Transition [forked]](https://codepen.io/smashingmag/pen/ogXELKE) by Blake Lundquist.

See the Pen Moving Highlight Navbar with View Transition [forked] by Blake Lundquist.

Conclusion

Animations and transitions between website UI states used to require many kilobytes of external libraries, along with verbose, confusing, and error-prone code, but vanilla JavaScript and CSS have since incorporated features to achieve native-app-like interactions without breaking the bank. We demonstrated this by implementing the “moving highlight” navigation pattern using two approaches: CSS transitions combined with the getBoundingClientRect() method and the View Transition API.

Resources

Smashing Editorial
(gg, yk)

Building An Offline-Friendly Image Upload System

Building An Offline-Friendly Image Upload System

Building An Offline-Friendly Image Upload System

Amejimaobari Ollornwi

2025-04-23T10:00:00+00:00
2025-06-20T10:32:35+00:00

So, you’re filling out an online form, and it asks you to upload a file. You click the input, select a file from your desktop, and are good to go. But something happens. The network drops, the file disappears, and you’re stuck having to re-upload the file. Poor network connectivity can lead you to spend an unreasonable amount of time trying to upload files successfully.

What ruins the user experience stems from having to constantly check network stability and retry the upload several times. While we may not be able to do much about network connectivity, as developers, we can always do something to ease the pain that comes with this problem.

One of the ways we can solve this problem is by tweaking image upload systems in a way that enables users to upload images offline — eliminating the need for a reliable network connection, and then having the system retry the upload process when the network becomes stable, without the user intervening.

This article is going to focus on explaining how to build an offline-friendly image upload system using PWA (progressive web application) technologies such as IndexedDB, service workers, and the Background Sync API. We will also briefly cover tips for improving the user experience for this system.

Planning The Offline Image Upload System

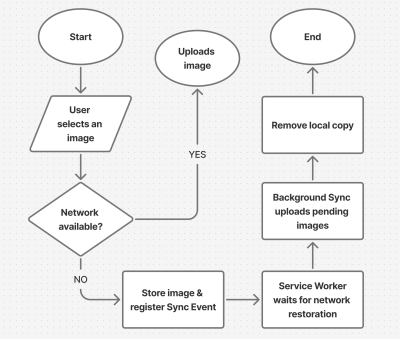
Here’s a flow chart for an offline-friendly image upload system.

Flow chart of an offline-friendly image upload system

Flow chart of an offline-friendly image upload system (Large preview)

As shown in the flow chart, the process unfolds as follows:

  1. The user selects an image.
    The process begins by letting the user select their image.
  2. The image is stored locally in IndexedDB.
    Next, the system checks for network connectivity. If network connectivity is available, the system uploads the image directly, avoiding unnecessary local storage usage. However, if the network is not available, the image will be stored in IndexedDB.
  3. The service worker detects when the network is restored.
    With the image stored in IndexedDB, the system waits to detect when the network connection is restored to continue with the next step.
  4. The background sync processes pending uploads.
    The moment the connection is restored, the system will try to upload the image again.
  5. The file is successfully uploaded.
    The moment the image is uploaded, the system will remove the local copy stored in IndexedDB.

Implementing The System

The first step in the system implementation is allowing the user to select their images. There are different ways you can achieve this:

  • You can use a simple element;
  • A drag-and-drop interface.

I would advise that you use both. Some users prefer to use the drag-and-drop interface, while others think the only way to upload images is through the element. Having both options will help improve the user experience. You can also consider allowing users to paste images directly in the browser using the Clipboard API.

Registering The Service Worker

At the heart of this solution is the service worker. Our service worker is going to be responsible for retrieving the image from the IndexedDB store, uploading it when the internet connection is restored, and clearing the IndexedDB store when the image has been uploaded.

To use a service worker, you first have to register one:

if ('serviceWorker' in navigator) {
  navigator.serviceWorker.register('/service-worker.js')
    .then(reg => console.log('Service Worker registered', reg))
    .catch(err => console.error('Service Worker registration failed', err));
}

Checking For Network Connectivity

Remember, the problem we are trying to solve is caused by unreliable network connectivity. If this problem does not exist, there is no point in trying to solve anything. Therefore, once the image is selected, we need to check if the user has a reliable internet connection before registering a sync event and storing the image in IndexedDB.

function uploadImage() {
  if (navigator.onLine) {
    // Upload Image
  } else {
    // register Sync Event
    // Store Images in IndexedDB
  }
}

Note: I’m only using the navigator.onLine property here to demonstrate how the system would work. The navigator.onLine property is unreliable, and I would suggest you come up with a custom solution to check whether the user is connected to the internet or not. One way you can do this is by sending a ping request to a server endpoint you’ve created.

Registering The Sync Event

Once the network test fails, the next step is to register a sync event. The sync event needs to be registered at the point where the system fails to upload the image due to a poor internet connection.

async function registerSyncEvent() {
  if ('SyncManager' in window) {
    const registration = await navigator.serviceWorker.ready;
    await registration.sync.register('uploadImages');
    console.log('Background Sync registered');
  }
}

After registering the sync event, you need to listen for it in the service worker.

self.addEventListener('sync', (event) => {
  if (event.tag === 'uploadImages') {
    event.waitUntil(sendImages());
  }
});

The sendImages function is going to be an asynchronous process that will retrieve the image from IndexedDB and upload it to the server. This is what it’s going to look like:

async function sendImages() {
  try {
    // await image retrieval and upload
  } catch (error) {
    // throw error
  }
}

Opening The Database

The first thing we need to do in order to store our image locally is to open an IndexedDB store. As you can see from the code below, we are creating a global variable to store the database instance. The reason for doing this is that, subsequently, when we want to retrieve our image from IndexedDB, we wouldn’t need to write the code to open the database again.

let database; // Global variable to store the database instance

function openDatabase() {
  return new Promise((resolve, reject) => {
    if (database) return resolve(database); // Return existing database instance 

    const request = indexedDB.open("myDatabase", 1);

    request.onerror = (event) => {
      console.error("Database error:", event.target.error);
      reject(event.target.error); // Reject the promise on error
    };

    request.onupgradeneeded = (event) => {
        const db = event.target.result;
        // Create the "images" object store if it doesn't exist.
        if (!db.objectStoreNames.contains("images")) {
          db.createObjectStore("images", { keyPath: "id" });
        }
        console.log("Database setup complete.");
    };

    request.onsuccess = (event) => {
      database = event.target.result; // Store the database instance globally
      resolve(database); // Resolve the promise with the database instance
    };
  });
}

Storing The Image In IndexedDB

With the IndexedDB store open, we can now store our images.

Now, you may be wondering why an easier solution like localStorage wasn’t used for this purpose.

The reason for that is that IndexedDB operates asynchronously and doesn’t block the main JavaScript thread, whereas localStorage runs synchronously and can block the JavaScript main thread if it is being used.

Here’s how you can store the image in IndexedDB:

async function storeImages(file) {
  // Open the IndexedDB database.
  const db = await openDatabase();
  // Create a transaction with read and write access.
  const transaction = db.transaction("images", "readwrite");
  // Access the "images" object store.
  const store = transaction.objectStore("images");
  // Define the image record to be stored.
  const imageRecord = {
    id: IMAGE_ID,   // a unique ID
    image: file     // Store the image file (Blob)
  };
  // Add the image record to the store.
  const addRequest = store.add(imageRecord);
  // Handle successful addition.
  addRequest.onsuccess = () => console.log("Image added successfully!");
  // Handle errors during insertion.
  addRequest.onerror = (e) => console.error("Error storing image:", e.target.error);
}

With the images stored and the background sync set, the system is ready to upload the image whenever the network connection is restored.

Retrieving And Uploading The Images

Once the network connection is restored, the sync event will fire, and the service worker will retrieve the image from IndexedDB and upload it.

async function retrieveAndUploadImage(IMAGE_ID) {
  try {
    const db = await openDatabase(); // Ensure the database is open
    const transaction = db.transaction("images", "readonly");
    const store = transaction.objectStore("images");
    const request = store.get(IMAGE_ID);
    request.onsuccess = function (event) {
      const image = event.target.result;
      if (image) {
        // upload Image to server here
      } else {
        console.log("No image found with ID:", IMAGE_ID);
      }
    };
    request.onerror = () => {
        console.error("Error retrieving image.");
    };
  } catch (error) {
    console.error("Failed to open database:", error);
  }
}

Deleting The IndexedDB Database

Once the image has been uploaded, the IndexedDB store is no longer needed. Therefore, it should be deleted along with its content to free up storage.

function deleteDatabase() {
  // Check if there's an open connection to the database.
  if (database) {
    database.close(); // Close the database connection
    console.log("Database connection closed.");
  }

  // Request to delete the database named "myDatabase".
  const deleteRequest = indexedDB.deleteDatabase("myDatabase");

  // Handle successful deletion of the database.
  deleteRequest.onsuccess = function () {
    console.log("Database deleted successfully!");
  };

  // Handle errors that occur during the deletion process.
  deleteRequest.onerror = function (event) {
    console.error("Error deleting database:", event.target.error);
  };

  // Handle cases where the deletion is blocked (e.g., if there are still open connections).
  deleteRequest.onblocked = function () {
    console.warn("Database deletion blocked. Close open connections and try again.");
  };
}

With that, the entire process is complete!

Considerations And Limitations

While we’ve done a lot to help improve the experience by supporting offline uploads, the system is not without its limitations. I figured I would specifically call those out because it’s worth knowing where this solution might fall short of your needs.

  • No Reliable Internet Connectivity Detection
    JavaScript does not provide a foolproof way to detect online status. For this reason, you need to come up with a custom solution for detecting online status.
  • Chromium-Only Solution
    The Background Sync API is currently limited to Chromium-based browsers. As such, this solution is only supported by Chromium browsers. That means you will need a more robust solution if you have the majority of your users on non-Chromium browsers.
  • IndexedDB Storage Policies
    Browsers impose storage limitations and eviction policies for IndexedDB. For instance, in Safari, data stored in IndexedDB has a lifespan of seven days if the user doesn’t interact with the website. This is something you should bear in mind if you do come up with an alternative for the background sync API that supports Safari.

Enhancing The User Experience

Since the entire process happens in the background, we need a way to inform the users when images are stored, waiting to be uploaded, or have been successfully uploaded. Implementing certain UI elements for this purpose will indeed enhance the experience for the users. These UI elements may include toast notifications, upload status indicators like spinners (to show active processes), progress bars (to show state progress), network status indicators, or buttons to provide retry and cancel options.

Wrapping Up

Poor internet connectivity can disrupt the user experience of a web application. However, by leveraging PWA technologies such as IndexedDB, service workers, and the Background Sync API, developers can help improve the reliability of web applications for their users, especially those in areas with unreliable internet connectivity.

Smashing Editorial
(gg, yk)

Creating An Effective Multistep Form For Better User Experience

Creating An Effective Multistep Form For Better User Experience

Creating An Effective Multistep Form For Better User Experience

Amejimaobari Ollornwi

2024-12-03T10:00:00+00:00
2025-06-20T10:32:35+00:00

For a multistep form, planning involves structuring questions logically across steps, grouping similar questions, and minimizing the number of steps and the amount of required information for each step. Whatever makes each step focused and manageable is what should be aimed for.

In this tutorial, we will create a multistep form for a job application. Here are the details we are going to be requesting from the applicant at each step:

  • Personal Information
    Collects applicant’s name, email, and phone number.
  • Work Experience
    Collects the applicant’s most recent company, job title, and years of experience.
  • Skills & Qualifications
    The applicant lists their skills and selects their highest degree.
  • Review & Submit
    This step is not going to collect any information. Instead, it provides an opportunity for the applicant to go back and review the information entered in the previous steps of the form before submitting it.

You can think of structuring these questions as a digital way of getting to know somebody. You can’t meet someone for the first time and ask them about their work experience without first asking for their name.

Based on the steps we have above, this is what the body of our HTML with our form should look like. First, the main element:


Step 1 is for filling in personal information, like the applicant’s name, email address, and phone number:


Step 1: Personal Information

Once the applicant completes the first step, we’ll navigate them to Step 2, focusing on their work experience so that we can collect information like their most recent company, job title, and years of experience. We’ll tack on a new

with those inputs:


Step 3 is all about the applicant listing their skills and qualifications for the job they’re applying for:


And, finally, we’ll allow the applicant to review their information before submitting it:


Notice: We’ve added a hidden attribute to every fieldset element but the first one. This ensures that the user sees only the first step. Once they are done with the first step, they can proceed to fill out their work experience on the second step by clicking a navigational button. We’ll add this button later on.

Adding Styles

To keep things focused, we’re not going to be emphasizing the styles in this tutorial. What we’ll do to keep things simple is leverage the Simple.css style framework to get the form in good shape for the rest of the tutorial.

If you’re following along, we can include Simple’s styles in the document :


And from there, go ahead and create a style.css file with the following styles that I’ve folded up.

View CSS body { min-height: 100vh; display: flex; align-items: center; justify-content: center; } main { padding: 0 30px; } h1 { font-size: 1.8rem; text-align: center; } .stepper { display: flex; justify-content: flex-end; padding-right: 10px; } form { box-shadow: 0px 0px 6px 2px rgba(0, 0, 0, 0.2); padding: 12px; } input, textarea, select { outline: none; } input:valid, textarea:valid, select:valid, input:focus:valid, textarea:focus:valid, select:focus:valid { border-color: green; } input:focus:invalid, textarea:focus:invalid, select:focus:invalid { border: 1px solid red; }

Form Navigation And Validation

An easy way to ruin the user experience for a multi-step form is to wait until the user gets to the last step in the form before letting them know of any error they made along the way. Each step of the form should be validated for errors before moving on to the next step, and descriptive error messages should be displayed to enable users to understand what is wrong and how to fix it.

Now, the only part of our form that is visible is the first step. To complete the form, users need to be able to navigate to the other steps. We are going to use several buttons to pull this off. The first step is going to have a Next button. The second and third steps are going to have both a Previous and a Next button, and the fourth step is going to have a Previous and a Submit button.


Notice: We’ve added onclick attributes to the Previous and Next buttons to link them to their respective JavaScript functions: previousStep() and nextStep().

The “Next” Button

The nextStep() function is linked to the Next button. Whenever the user clicks the Next button, the nextStep() function will first check to ensure that all the fields for whatever step the user is on have been filled out correctly before moving on to the next step. If the fields haven’t been filled correctly, it displays some error messages, letting the user know that they’ve done something wrong and informing them what to do to make the errors go away.

Before we go into the implementation of the nextStep function, there are certain variables we need to define because they will be needed in the function. First, we need the input fields from the DOM so we can run checks on them to make sure they are valid.

// Step 1 fields
const name = document.getElementById("name");
const email = document.getElementById("email");
const phone = document.getElementById("phone");

// Step 2 fields
const company = document.getElementById("company");
const jobTitle = document.getElementById("jobTitle");
const yearsExperience = document.getElementById("yearsExperience");

// Step 3 fields
const skills = document.getElementById("skills");
const highestDegree = document.getElementById("highestDegree");

Then, we’re going to need an array to store our error messages.

let errorMsgs = [];

Also, we would need an element in the DOM where we can insert those error messages after they’ve been generated. This element should be placed in the HTML just below the last fieldset closing tag:

Add the above div to the JavaScript code using the following line:

const errorMessagesDiv = document.getElementById("errorMessages");

And finally, we need a variable to keep track of the current step.

let currentStep = 1;

Now that we have all our variables in place, here’s the implementation of the nextstep() function:

function nextStep() {
  errorMsgs = [];
  errorMessagesDiv.innerText = "";

  switch (currentStep) {
    case 1:
      addValidationErrors(name, email, phone);
      validateStep(errorMsgs);
      break;

    case 2:
      addValidationErrors(company, jobTitle, yearsExperience);
      validateStep(errorMsgs);
      break;

    case 3:
      addValidationErrors(skills, highestDegree);
      validateStep(errorMsgs);
      break;
  }
}

The moment the Next button is pressed, our code first checks which step the user is currently on, and based on this information, it validates the data for that specific step by calling the addValidationErrors() function. If there are errors, we display them. Then, the form calls the validateStep() function to verify that there are no errors before moving on to the next step. If there are errors, it prevents the user from going on to the next step.

Whenever the nextStep() function runs, the error messages are cleared first to avoid appending errors from a different step to existing errors or re-adding existing error messages when the addValidationErrors function runs. The addValidationErrors function is called for each step using the fields for that step as arguments.

Here’s how the addValidationErrors function is implemented:

function addValidationErrors(fieldOne, fieldTwo, fieldThree = undefined) {
  if (!fieldOne.checkValidity()) {
    const label = document.querySelector(`label[for="${fieldOne.id}"]`);
    errorMsgs.push(`Please Enter A Valid ${label.textContent}`);
  }

  if (!fieldTwo.checkValidity()) {
    const label = document.querySelector(`label[for="${fieldTwo.id}"]`);
    errorMsgs.push(`Please Enter A Valid ${label.textContent}`);
  }

  if (fieldThree && !fieldThree.checkValidity()) {
    const label = document.querySelector(`label[for="${fieldThree.id}"]`);
    errorMsgs.push(`Please Enter A Valid ${label.textContent}`);
  }

  if (errorMsgs.length > 0) {
    errorMessagesDiv.innerText = errorMsgs.join("n");
  }
}

This is how the validateStep() function is defined:

function validateStep(errorMsgs) {
  if (errorMsgs.length === 0) {
    showStep(currentStep + 1);
  }
}

The validateStep() function checks for errors. If there are none, it proceeds to the next step with the help of the showStep() function.

function showStep(step) {
  steps.forEach((el, index) => {
    el.hidden = index + 1 !== step;
  });
  currentStep = step;
}

The showStep() function requires the four fieldsets in the DOM. Add the following line to the top of the JavaScript code to make the fieldsets available:

const steps = document.querySelectorAll(".step");

What the showStep() function does is to go through all the fieldsets in our form and hide whatever fieldset is not equal to the one we’re navigating to. Then, it updates the currentStep variable to be equal to the step we’re navigating to.

The “Previous” Button

The previousStep() function is linked to the Previous button. Whenever the previous button is clicked, similarly to the nextStep function, the error messages are also cleared from the page, and navigation is also handled by the showStep function.

function previousStep() {
  errorMessagesDiv.innerText = "";
  showStep(currentStep - 1);
}

Whenever the showStep() function is called with “currentStep - 1” as an argument (as in this case), we go back to the previous step, while moving to the next step happens by calling the showStep() function with “currentStep + 1” as an argument (as in the case of the validateStep() function).

Improving User Experience With Visual Cues

One other way of improving the user experience for a multi-step form, is by integrating visual cues, things that will give users feedback on the process they are on. These things can include a progress indicator or a stepper to help the user know the exact step they are on.

Integrating A Stepper

To integrate a stepper into our form (sort of like this one from Material Design), the first thing we need to do is add it to the HTML just below the opening tag.


1/4

Next, we need to query the part of the stepper that will represent the current step. This is the span tag with the class name of currentStep.

const currentStepDiv = document.querySelector(".currentStep");

Now, we need to update the stepper value whenever the previous or next buttons are clicked. To do this, we need to update the showStep() function by appending the following line to it:

currentStepDiv.innerText = currentStep;

This line is added to the showStep() function because the showStep() function is responsible for navigating between steps and updating the currentStep variable. So, whenever the currentStep variable is updated, the currentStepDiv should also be updated to reflect that change.

Storing And Retrieving User Data

One major way we can improve the form’s user experience is by storing user data in the browser. Multistep forms are usually long and require users to enter a lot of information about themselves. Imagine a user filling out 95% of a form, then accidentally hitting the F5 button on their keyboard and losing all their progress. That would be a really bad experience for the user.

Using localStorage, we can store user information as soon as it is entered and retrieve it as soon as the DOM content is loaded, so users can always continue filling out their forms from wherever they left off. To add this feature to our forms, we can begin by saving the user’s information as soon as it is typed. This can be achieved using the input event.

Before adding the input event listener, get the form element from the DOM:

const form = document.getElementById("jobApplicationForm");

Now we can add the input event listener:

// Save data on each input event
form.addEventListener("input", () => {
  const formData = {
    name: document.getElementById("name").value,
    email: document.getElementById("email").value,
    phone: document.getElementById("phone").value,
    company: document.getElementById("company").value,
    jobTitle: document.getElementById("jobTitle").value,
    yearsExperience: document.getElementById("yearsExperience").value,
    skills: document.getElementById("skills").value,
    highestDegree: document.getElementById("highestDegree").value,
  };
  localStorage.setItem("formData", JSON.stringify(formData));
});

Next, we need to add some code to help us retrieve the user data once the DOM content is loaded.

window.addEventListener("DOMContentLoaded", () => {
  const savedData = JSON.parse(localStorage.getItem("formData"));
  if (savedData) {
    document.getElementById("name").value = savedData.name || "";
    document.getElementById("email").value = savedData.email || "";
    document.getElementById("phone").value = savedData.phone || "";
    document.getElementById("company").value = savedData.company || "";
    document.getElementById("jobTitle").value = savedData.jobTitle || "";
    document.getElementById("yearsExperience").value = savedData.yearsExperience || "";
    document.getElementById("skills").value = savedData.skills || "";
    document.getElementById("highestDegree").value = savedData.highestDegree || "";
  }
});

Lastly, it is good practice to remove data from localStorage as soon as it is no longer needed:

// Clear data on form submit
form.addEventListener('submit', () => {
  // Clear localStorage once the form is submitted
  localStorage.removeItem('formData');
}); 

Adding The Current Step Value To localStorage

If the user accidentally closes their browser, they should be able to return to wherever they left off. This means that the current step value also has to be saved in localStorage.

To save this value, append the following line to the showStep() function:

localStorage.setItem("storedStep", currentStep);

Now we can retrieve the current step value and return users to wherever they left off whenever the DOM content loads. Add the following code to the DOMContentLoaded handler to do so:

const storedStep = localStorage.getItem("storedStep");

if (storedStep) {
    const storedStepInt = parseInt(storedStep);
    steps.forEach((el, index) => {
      el.hidden = index + 1 !== storedStepInt;
    });
    currentStep = storedStepInt;
    currentStepDiv.innerText = currentStep;
  }

Also, do not forget to clear the current step value from localStorage when the form is submitted.

localStorage.removeItem("storedStep");

The above line should be added to the submit handler.

Wrapping Up

Creating multi-step forms can help improve user experience for complex data entry. By carefully planning out steps, implementing form validation at each step, and temporarily storing user data in the browser, you make it easier for users to complete long forms.

For the full implementation of this multi-step form, you can access the complete code on GitHub.

Smashing Editorial
(gg, yk)

Build A Static RSS Reader To Fight Your Inner FOMO

Build A Static RSS Reader To Fight Your Inner FOMO

Build A Static RSS Reader To Fight Your Inner FOMO

Karin Hendrikse

2024-10-07T13:00:00+00:00
2025-06-20T10:32:35+00:00

In a fast-paced industry like tech, it can be hard to deal with the fear of missing out on important news. But, as many of us know, there’s an absolutely huge amount of information coming in daily, and finding the right time and balance to keep up can be difficult, if not stressful. A classic piece of technology like an RSS feed is a delightful way of taking back ownership of our own time. In this article, we will create a static Really Simple Syndication (RSS) reader that will bring you the latest curated news only once (yes: once) a day.

We’ll obviously work with RSS technology in the process, but we’re also going to combine it with some things that maybe you haven’t tried before, including Astro (the static site framework), TypeScript (for JavaScript goodies), a package called rss-parser (for connecting things together), as well as scheduled functions and build hooks provided by Netlify (although there are other services that do this).

I chose these technologies purely because I really, really enjoy them! There may be other solutions out there that are more performant, come with more features, or are simply more comfortable to you — and in those cases, I encourage you to swap in whatever you’d like. The most important thing is getting the end result!

The Plan

Here’s how this will go. Astro generates the website. I made the intentional decision to use a static site because I want the different RSS feeds to be fetched only once during build time, and that’s something we can control each time the site is “rebuilt” and redeployed with updates. That’s where Netlify’s scheduled functions come into play, as they let us trigger rebuilds automatically at specific times. There is no need to manually check for updates and deploy them! Cron jobs can just as readily do this if you prefer a server-side solution.

During the triggered rebuild, we’ll let the rss-parser package do exactly what it says it does: parse a list of RSS feeds that are contained in an array. The package also allows us to set a filter for the fetched results so that we only get ones from the past day, week, and so on. Personally, I only render the news from the last seven days to prevent content overload. We’ll get there!

But first…

What Is RSS?

RSS is a web feed technology that you can feed into a reader or news aggregator. Because RSS is standardized, you know what to expect when it comes to the feed’s format. That means we have a ton of fun possibilities when it comes to handling the data that the feed provides. Most news websites have their own RSS feed that you can subscribe to (this is Smashing Magazine’s RSS feed: https://www.smashingmagazine.com/feed/). An RSS feed is capable of updating every time a site publishes new content, which means it can be a quick source of the latest news, but we can tailor that frequency as well.

RSS feeds are written in an Extensible Markup Language (XML) format and have specific elements that can be used within it. Instead of focusing too much on the technicalities here, I’ll give you a link to the RSS specification. Don’t worry; that page should be scannable enough for you to find the most pertinent information you need, like the kinds of elements that are supported and what they represent. For this tutorial, we’re only using the following elements: , , , , and . We’ll also let our RSS parser package do some of the work for us.

Creating The State Site

We’ll start by creating our Astro site! In your terminal run pnpm create astro@latest. You can use any package manager you want — I’m simply trying out pnpm for myself.

After running the command, Astro’s chat-based helper, Houston, walks through some setup questions to get things started.

 astro   Launch sequence initiated.

   dir   Where should we create your new project?
         ./rss-buddy

  tmpl   How would you like to start your new project?
         Include sample files

    ts   Do you plan to write TypeScript?
         Yes

   use   How strict should TypeScript be?
         Strict

  deps   Install dependencies?
         Yes

   git   Initialize a new git repository?
         Yes

I like to use Astro’s sample files so I can get started quickly, but we’re going to clean them up a bit in the process. Let’s clean up the src/pages/index.astro file by removing everything inside of the

tags. Then we’re good to go!

From there, we can spin things by running pnpm start. Your terminal will tell you which localhost address you can find your site at.

Pulling Information From RSS feeds

The src/pages/index.astro file is where we will make an array of RSS feeds we want to follow. We will be using Astro’s template syntax, so between the two code fences (—), create an array of feedSources and add some feeds. If you need inspiration, you can copy this:

const feedSources = [
  'https://www.smashingmagazine.com/feed/',
  'https://developer.mozilla.org/en-US/blog/rss.xml',
  // etc.
]

Now we’ll install the rss-parser package in our project by running pnpm install rss-parser. This package is a small library that turns the XML that we get from fetching an RSS feed into JavaScript objects. This makes it easy for us to read our RSS feeds and manipulate the data any way we want.

Once the package is installed, open the src/pages/index.astro file, and at the top, we’ll import the rss-parser and instantiate the Partner class.

import Parser from 'rss-parser';
const parser = new Parser();

We use this parser to read our RSS feeds and (surprise!) parse them to JavaScript. We’re going to be dealing with a list of promises here. Normally, I would probably use Promise.all(), but the thing is, this is supposed to be a complicated experience. If one of the feeds doesn’t work for some reason, I’d prefer to simply ignore it.

Why? Well, because Promise.all() rejects everything even if only one of its promises is rejected. That might mean that if one feed doesn’t behave the way I’d expect it to, my entire page would be blank when I grab my hot beverage to read the news in the morning. I do not want to start my day confronted by an error.

Instead, I’ll opt to use Promise.allSettled(). This method will actually let all promises complete even if one of them fails. In our case, this means any feed that errors will just be ignored, which is perfect.

Let’s add this to the src/pages/index.astro file:

interface FeedItem {
  feed?: string;
  title?: string;
  link?: string;
  date?: Date;
}

const feedItems: FeedItem[] = [];

await Promise.allSettled(
  feedSources.map(async (source) => {
    try {
      const feed = await parser.parseURL(source);
      feed.items.forEach((item) => {
        const date = item.pubDate ? new Date(item.pubDate) : undefined;
        
          feedItems.push({
            feed: feed.title,
            title: item.title,
            link: item.link,
            date,
          });
      });
    } catch (error) {
      console.error(`Error fetching feed from ${source}:`, error);
    }
  })
);

This creates an array (or more) named feedItems. For each URL in the feedSources array we created earlier, the rss-parser retrieves the items and, yes, parses them into JavaScript. Then, we return whatever data we want! We’ll keep it simple for now and only return the following:

  • The feed title,
  • The title of the feed item,
  • The link to the item,
  • And the item’s published date.

The next step is to ensure that all items are sorted by date so we’ll truly get the “latest” news. Add this small piece of code to our work:

const sortedFeedItems = feedItems.sort((a, b) => (b.date ?? new Date()).getTime() - (a.date ?? new Date()).getTime());

Oh, and… remember when I said I didn’t want this RSS reader to render anything older than seven days? Let’s tackle that right now since we’re already in this code.

We’ll make a new variable called sevenDaysAgo and assign it a date. We’ll then set that date to seven days ago and use that logic before we add a new item to our feedItems array.

This is what the src/pages/index.astro file should now look like at this point:

---
import Layout from '../layouts/Layout.astro';
import Parser from 'rss-parser';
const parser = new Parser();

const sevenDaysAgo = new Date();
sevenDaysAgo.setDate(sevenDaysAgo.getDate() - 7);

const feedSources = [
  'https://www.smashingmagazine.com/feed/',
  'https://developer.mozilla.org/en-US/blog/rss.xml',
]

interface FeedItem {
  feed?: string;
  title?: string;
  link?: string;
  date?: Date;
}

const feedItems: FeedItem[] = [];

await Promise.allSettled(
  feedSources.map(async (source) => {
    try {
      const feed = await parser.parseURL(source);
      feed.items.forEach((item) => {
        const date = item.pubDate ? new Date(item.pubDate) : undefined;
        if (date && date >= sevenDaysAgo) {
          feedItems.push({
            feed: feed.title,
            title: item.title,
            link: item.link,
            date,
          });
        }
      });
    } catch (error) {
      console.error(`Error fetching feed from ${source}:`, error);
    }
  })
);

const sortedFeedItems = feedItems.sort((a, b) => (b.date ?? new Date()).getTime() - (a.date ?? new Date()).getTime());

---


Rendering XML Data

It’s time to show our news articles on the Astro site! To keep this simple, we’ll format the items in an unordered list rather than some other fancy layout.

All we need to do is update the element in the file with the XML objects sprinkled in for a feed item’s title, URL, and publish date.


{sortedFeedItems.map(item => ( ))}

Go ahead and run pnpm start from the terminal. The page should display an unordered list of feed items. Of course, everything is styled at the moment, but luckily for you, you can make it look exactly like you want with CSS!

And remember that there are even more fields available in the XML for each item if you want to display more information. If you run the following snippet in your DevTools console, you’ll see all of the fields you have at your disposal:

feed.items.forEach(item => {}

Scheduling Daily Static Site Builds

We’re nearly done! The feeds are being fetched, and they are returning data back to us in JavaScript for use in our Astro page template. Since feeds are updated whenever new content is published, we need a way to fetch the latest items from it.

We want to avoid doing any of this manually. So, let’s set this site on Netlify to gain access to their scheduled functions that trigger a rebuild and their build hooks that do the building. Again, other services do this, and you’re welcome to roll this work with another provider — I’m just partial to Netlify since I work there. In any case, you can follow Netlify’s documentation for setting up a new site.

Once your site is hosted and live, you are ready to schedule your rebuilds. A build hook gives you a URL to use to trigger the new build, looking something like this:

https://api.netlify.com/build_hooks/your-build-hook-id

Let’s trigger builds every day at midnight. We’ll use Netlify’s scheduled functions. That’s really why I’m using Netlify to host this in the first place. Having them at the ready via the host greatly simplifies things since there’s no server work or complicated configurations to get this going. Set it and forget it!

We’ll install @netlify/functions (instructions) to the project and then create the following file in the project’s root directory: netlify/functions/deploy.ts.

This is what we want to add to that file:

// netlify/functions/deploy.ts

import type { Config } from '@netlify/functions';

const BUILD_HOOK =
  'https://api.netlify.com/build_hooks/your-build-hook-id'; // replace me!

export default async (req: Request) => {
  await fetch(BUILD_HOOK, {
    method: 'POST',
  })
};

export const config: Config = {
  schedule: '0 0 * * *',
};

If you commit your code and push it, your site should re-deploy automatically. From that point on, it follows a schedule that rebuilds the site every day at midnight, ready for you to take your morning brew and catch up on everything that you think is important.

Smashing Editorial
(gg, yk)

Generating Unique Random Numbers In JavaScript Using Sets

Generating Unique Random Numbers In JavaScript Using Sets

Generating Unique Random Numbers In JavaScript Using Sets

Amejimaobari Ollornwi

2024-08-26T15:00:00+00:00
2025-06-20T10:32:35+00:00

JavaScript comes with a lot of built-in functions that allow you to carry out so many different operations. One of these built-in functions is the Math.random() method, which generates a random floating-point number that can then be manipulated into integers.

However, if you wish to generate a series of unique random numbers and create more random effects in your code, you will need to come up with a custom solution for yourself because the Math.random() method on its own cannot do that for you.

In this article, we’re going to be learning how to circumvent this issue and generate a series of unique random numbers using the Set object in JavaScript, which we can then use to create more randomized effects in our code.

Note: This article assumes that you know how to generate random numbers in JavaScript, as well as how to work with sets and arrays.

Generating a Unique Series of Random Numbers

One of the ways to generate a unique series of random numbers in JavaScript is by using Set objects. The reason why we’re making use of sets is because the elements of a set are unique. We can iteratively generate and insert random integers into sets until we get the number of integers we want.

And since sets do not allow duplicate elements, they are going to serve as a filter to remove all of the duplicate numbers that are generated and inserted into them so that we get a set of unique integers.

Here’s how we are going to approach the work:

  1. Create a Set object.
  2. Define how many random numbers to produce and what range of numbers to use.
  3. Generate each random number and immediately insert the numbers into the Set until the Set is filled with a certain number of them.

The following is a quick example of how the code comes together:

function generateRandomNumbers(count, min, max) {
  // 1: Create a `Set` object
  let uniqueNumbers = new Set();
  while (uniqueNumbers.size < count) {
    // 2: Generate each random number
    uniqueNumbers.add(Math.floor(Math.random() * (max - min + 1)) + min);
  }
  // 3: Immediately insert them numbers into the Set...
  return Array.from(uniqueNumbers);
}
// ...set how many numbers to generate from a given range
console.log(generateRandomNumbers(5, 5, 10));

What the code does is create a new Set object and then generate and add the random numbers to the set until our desired number of integers has been included in the set. The reason why we’re returning an array is because they are easier to work with.

One thing to note, however, is that the number of integers you want to generate (represented by count in the code) should be less than the upper limit of your range plus one (represented by max + 1 in the code). Otherwise, the code will run forever. You can add an if statement to the code to ensure that this is always the case:

function generateRandomNumbers(count, min, max) {
  // if statement checks that `count` is less than `max + 1`
  if (count > max + 1) {
    return "count cannot be greater than the upper limit of range";
  } else {
    let uniqueNumbers = new Set();
    while (uniqueNumbers.size < count) {
      uniqueNumbers.add(Math.floor(Math.random() * (max - min + 1)) + min);
    }
    return Array.from(uniqueNumbers);
  }
}
console.log(generateRandomNumbers(5, 5, 10));

Using the Series of Unique Random Numbers as Array Indexes

It is one thing to generate a series of random numbers. It’s another thing to use them.

Being able to use a series of random numbers with arrays unlocks so many possibilities: you can use them in shuffling playlists in a music app, randomly sampling data for analysis, or, as I did, shuffling the tiles in a memory game.

Let’s take the code from the last example and work off of it to return random letters of the alphabet. First, we’ll construct an array of letters:

const englishAlphabets = [
  'A', 'B', 'C', 'D', 'E', 'F', 'G', 'H', 'I', 'J', 'K', 'L', 'M', 
  'N', 'O', 'P', 'Q', 'R', 'S', 'T', 'U', 'V', 'W', 'X', 'Y', 'Z'
];

// rest of code

Then we map the letters in the range of numbers:

const englishAlphabets = [
  'A', 'B', 'C', 'D', 'E', 'F', 'G', 'H', 'I', 'J', 'K', 'L', 'M', 
  'N', 'O', 'P', 'Q', 'R', 'S', 'T', 'U', 'V', 'W', 'X', 'Y', 'Z'
];

// generateRandomNumbers()

const randomAlphabets = randomIndexes.map((index) => englishAlphabets[index]);

In the original code, the generateRandomNumbers() function is logged to the console. This time, we’ll construct a new variable that calls the function so it can be consumed by randomAlphabets:

const englishAlphabets = [
  'A', 'B', 'C', 'D', 'E', 'F', 'G', 'H', 'I', 'J', 'K', 'L', 'M', 
  'N', 'O', 'P', 'Q', 'R', 'S', 'T', 'U', 'V', 'W', 'X', 'Y', 'Z'
];

// generateRandomNumbers()

const randomIndexes = generateRandomNumbers(5, 0, 25);
const randomAlphabets = randomIndexes.map((index) => englishAlphabets[index]);

Now we can log the output to the console like we did before to see the results:

const englishAlphabets = [
  'A', 'B', 'C', 'D', 'E', 'F', 'G', 'H', 'I', 'J', 'K', 'L', 'M', 
  'N', 'O', 'P', 'Q', 'R', 'S', 'T', 'U', 'V', 'W', 'X', 'Y', 'Z'
];

// generateRandomNumbers()

const randomIndexes = generateRandomNumbers(5, 0, 25);
const randomAlphabets = randomIndexes.map((index) => englishAlphabets[index]);
console.log(randomAlphabets);

And, when we put the generateRandomNumbers() function definition back in, we get the final code:

const englishAlphabets = [
  'A', 'B', 'C', 'D', 'E', 'F', 'G', 'H', 'I', 'J', 'K', 'L', 'M', 
  'N', 'O', 'P', 'Q', 'R', 'S', 'T', 'U', 'V', 'W', 'X', 'Y', 'Z'
];
function generateRandomNumbers(count, min, max) {
  if (count > max + 1) {
    return "count cannot be greater than the upper limit of range";
  } else {
    let uniqueNumbers = new Set();
    while (uniqueNumbers.size  englishAlphabets[index]);
console.log(randomAlphabets);

So, in this example, we created a new array of alphabets by randomly selecting some letters in our englishAlphabets array.

You can pass in a count argument of englishAlphabets.length to the generateRandomNumbers function if you desire to shuffle the elements in the englishAlphabets array instead. This is what I mean:

generateRandomNumbers(englishAlphabets.length, 0, 25);

Wrapping Up

In this article, we’ve discussed how to create randomization in JavaScript by covering how to generate a series of unique random numbers, how to use these random numbers as indexes for arrays, and also some practical applications of randomization.

The best way to learn anything in software development is by consuming content and reinforcing whatever knowledge you’ve gotten from that content by practicing. So, don’t stop here. Run the examples in this tutorial (if you haven’t done so), play around with them, come up with your own unique solutions, and also don’t forget to share your good work. Ciao!

Smashing Editorial
(yk)

Regexes Got Good: The History And Future Of Regular Expressions In JavaScript

Regexes Got Good: The History And Future Of Regular Expressions In JavaScript

Regexes Got Good: The History And Future Of Regular Expressions In JavaScript

Steven Levithan

2024-08-20T15:00:00+00:00
2025-06-20T10:32:35+00:00

Modern JavaScript regular expressions have come a long way compared to what you might be familiar with. Regexes can be an amazing tool for searching and replacing text, but they have a longstanding reputation (perhaps outdated, as I’ll show) for being difficult to write and understand.

This is especially true in JavaScript-land, where regexes languished for many years, comparatively underpowered compared to their more modern counterparts in PCRE, Perl, .NET, Java, Ruby, C++, and Python. Those days are over.

In this article, I’ll recount the history of improvements to JavaScript regexes (spoiler: ES2018 and ES2024 changed the game), show examples of modern regex features in action, introduce you to a lightweight JavaScript library that makes JavaScript stand alongside or surpass other modern regex flavors, and end with a preview of active proposals that will continue to improve regexes in future versions of JavaScript (with some of them already working in your browser today).

The History of Regular Expressions in JavaScript

ECMAScript 3, standardized in 1999, introduced Perl-inspired regular expressions to the JavaScript language. Although it got enough things right to make regexes pretty useful (and mostly compatible with other Perl-inspired flavors), there were some big omissions, even then. And while JavaScript waited 10 years for its next standardized version with ES5, other programming languages and regex implementations added useful new features that made their regexes more powerful and readable.

But that was then.

Did you know that nearly every new version of JavaScript has made at least minor improvements to regular expressions?

Let’s take a look at them.

Don’t worry if it’s hard to understand what some of the following features mean — we’ll look more closely at several of the key features afterward.

  • ES5 (2009) fixed unintuitive behavior by creating a new object every time regex literals are evaluated and allowed regex literals to use unescaped forward slashes within character classes (/[/]/).
  • ES6/ES2015 added two new regex flags: y (sticky), which made it easier to use regexes in parsers, and u (unicode), which added several significant Unicode-related improvements along with strict errors. It also added the RegExp.prototype.flags getter, support for subclassing RegExp, and the ability to copy a regex while changing its flags.
  • ES2018 was the edition that finally made JavaScript regexes pretty good. It added the s (dotAll) flag, lookbehind, named capture, and Unicode properties (via p{...} and P{...}, which require ES6’s flag u). All of these are extremely useful features, as we’ll see.
  • ES2020 added the string method matchAll, which we’ll also see more of shortly.
  • ES2022 added flag d (hasIndices), which provides start and end indices for matched substrings.
  • And finally, ES2024 added flag v (unicodeSets) as an upgrade to ES6’s flag u. The v flag adds a set of multicharacter “properties of strings” to p{...}, multicharacter elements within character classes via p{...} and q{...}, nested character classes, set subtraction [A--B] and intersection [A&&B], and different escaping rules within character classes. It also fixed case-insensitive matching for Unicode properties within negated sets [^...].

As for whether you can safely use these features in your code today, the answer is yes! The latest of these features, flag v, is supported in Node.js 20 and 2023-era browsers. The rest are supported in 2021-era browsers or earlier.

Each edition from ES2019 to ES2023 also added additional Unicode properties that can be used via p{...} and P{...}. And to be a completionist, ES2021 added string method replaceAll — although, when given a regex, the only difference from ES3’s replace is that it throws if not using flag g.

Aside: What Makes a Regex Flavor Good?

With all of these changes, how do JavaScript regular expressions now stack up against other flavors? There are multiple ways to think about this, but here are a few key aspects:

  • Performance.
    This is an important aspect but probably not the main one since mature regex implementations are generally pretty fast. JavaScript is strong on regex performance (at least considering V8’s Irregexp engine, used by Node.js, Chromium-based browsers, and even Firefox; and JavaScriptCore, used by Safari), but it uses a backtracking engine that is missing any syntax for backtracking control — a major limitation that makes ReDoS vulnerability more common.
  • Support for advanced features that handle common or important use cases.
    Here, JavaScript stepped up its game with ES2018 and ES2024. JavaScript is now best in class for some features like lookbehind (with its infinite-length support) and Unicode properties (with multicharacter “properties of strings,” set subtraction and intersection, and script extensions). These features are either not supported or not as robust in many other flavors.
  • Ability to write readable and maintainable patterns.
    Here, native JavaScript has long been the worst of the major flavors since it lacks the x (“extended”) flag that allows insignificant whitespace and comments. Additionally, it lacks regex subroutines and subroutine definition groups (from PCRE and Perl), a powerful set of features that enable writing grammatical regexes that build up complex patterns via composition.

So, it’s a bit of a mixed bag.

JavaScript regexes have become exceptionally powerful, but they’re still missing key features that could make regexes safer, more readable, and more maintainable (all of which hold some people back from using this power).

The good news is that all of these holes can be filled by a JavaScript library, which we’ll see later in this article.

Using JavaScript’s Modern Regex Features

Let’s look at a few of the more useful modern regex features that you might be less familiar with. You should know in advance that this is a moderately advanced guide. If you’re relatively new to regex, here are some excellent tutorials you might want to start with:

Named Capture

Often, you want to do more than just check whether a regex matches — you want to extract substrings from the match and do something with them in your code. Named capturing groups allow you to do this in a way that makes your regexes and code more readable and self-documenting.

The following example matches a record with two date fields and captures the values:

const record = 'Admitted: 2024-01-01nReleased: 2024-01-03';
const re = /^Admitted: (?d{4}-d{2}-d{2})nReleased: (?d{4}-d{2}-d{2})$/;
const match = record.match(re);
console.log(match.groups);
/* → {
  admitted: '2024-01-01',
  released: '2024-01-03'
} */

Don’t worry — although this regex might be challenging to understand, later, we’ll look at a way to make it much more readable. The key things here are that named capturing groups use the syntax (?...), and their results are stored on the groups object of matches.

You can also use named backreferences to rematch whatever a named capturing group matched via k, and you can use the values within search and replace as follows:

// Change 'FirstName LastName' to 'LastName, FirstName'
const name = 'Shaquille Oatmeal';
name.replace(/(?w+) (?w+)/, '$, $');
// → 'Oatmeal, Shaquille'

For advanced regexers who want to use named backreferences within a replacement callback function, the groups object is provided as the last argument. Here’s a fancy example:

function fahrenheitToCelsius(str) {
  const re = /(?-?d+(.d+)?)Fb/g;
  return str.replace(re, (...args) => {
    const groups = args.at(-1);
    return Math.round((groups.degrees - 32) * 5/9) + 'C';
  });
}
fahrenheitToCelsius('98.6F');
// → '37C'
fahrenheitToCelsius('May 9 high is 40F and low is 21F');
// → 'May 9 high is 4C and low is -6C'

Lookbehind

Lookbehind (introduced in ES2018) is the complement to lookahead, which has always been supported by JavaScript regexes. Lookahead and lookbehind are assertions (similar to ^ for the start of a string or b for word boundaries) that don’t consume any characters as part of the match. Lookbehinds succeed or fail based on whether their subpattern can be found immediately before the current match position.

For example, the following regex uses a lookbehind (?<=...) to match the word “cat” (only the word “cat”) if it’s preceded by “fat ”:

const re = /(?<=fat )cat/g;
'cat, fat cat, brat cat'.replace(re, 'pigeon');
// → 'cat, fat pigeon, brat cat'

You can also use negative lookbehind — written as (?<!...) — to invert the assertion. That would make the regex match any instance of “cat” that’s not preceded by “fat ”.

const re = /(?<!fat )cat/g;
'cat, fat cat, brat cat'.replace(re, 'pigeon');
// → 'pigeon, fat cat, brat pigeon'

JavaScript’s implementation of lookbehind is one of the very best (matched only by .NET). Whereas other regex flavors have inconsistent and complex rules for when and whether they allow variable-length patterns inside lookbehind, JavaScript allows you to look behind for any subpattern.

The matchAll Method

JavaScript’s String.prototype.matchAll was added in ES2020 and makes it easier to operate on regex matches in a loop when you need extended match details. Although other solutions were possible before, matchAll is often easier, and it avoids gotchas, such as the need to guard against infinite loops when looping over the results of regexes that might return zero-length matches.

Since matchAll returns an iterator (rather than an array), it’s easy to use it in a for...of loop.

const re = /(?w)(?w)/g;
for (const match of str.matchAll(re)) {
  const {char1, char2} = match.groups;
  // Print each complete match and matched subpatterns
  console.log(`Matched "${match[0]}" with "${char1}" and "${char2}"`);
}

Note: matchAll requires its regexes to use flag g (global). Also, as with other iterators, you can get all of its results as an array using Array.from or array spreading.

const matches = [...str.matchAll(/./g)];

Unicode Properties

Unicode properties (added in ES2018) give you powerful control over multilingual text, using the syntax p{...} and its negated version P{...}. There are hundreds of different properties you can match, which cover a wide variety of Unicode categories, scripts, script extensions, and binary properties.

Note: For more details, check out the documentation on MDN.

Unicode properties require using the flag u (unicode) or v (unicodeSets).

Flag v

Flag v (unicodeSets) was added in ES2024 and is an upgrade to flag u — you can’t use both at the same time. It’s a best practice to always use one of these flags to avoid silently introducing bugs via the default Unicode-unaware mode. The decision on which to use is fairly straightforward. If you’re okay with only supporting environments with flag v (Node.js 20 and 2023-era browsers), then use flag v; otherwise, use flag u.

Flag v adds support for several new regex features, with the coolest probably being set subtraction and intersection. This allows using A--B (within character classes) to match strings in A but not in B or using A&&B to match strings in both A and B. For example:

// Matches all Greek symbols except the letter 'π'
/[p{Script_Extensions=Greek}--π]/v

// Matches only Greek letters
/[p{Script_Extensions=Greek}&&p{Letter}]/v

For more details about flag v, including its other new features, check out this explainer from the Google Chrome team.

A Word on Matching Emoji

Emoji are 🤩🔥😎👌, but how emoji get encoded in text is complicated. If you’re trying to match them with a regex, it’s important to be aware that a single emoji can be composed of one or many individual Unicode code points. Many people (and libraries!) who roll their own emoji regexes miss this point (or implement it poorly) and end up with bugs.

The following details for the emoji “👩🏻‍🏫” (Woman Teacher: Light Skin Tone) show just how complicated emoji can be:

// Code unit length
'👩🏻‍🏫'.length;
// → 7
// Each astral code point (above uFFFF) is divided into high and low surrogates

// Code point length
[...'👩🏻‍🏫'].length;
// → 4
// These four code points are: u{1F469} u{1F3FB} u{200D} u{1F3EB}
// u{1F469} combined with u{1F3FB} is '👩🏻'
// u{200D} is a Zero-Width Joiner
// u{1F3EB} is '🏫'

// Grapheme cluster length (user-perceived characters)
[...new Intl.Segmenter().segment('👩🏻‍🏫')].length;
// → 1

Fortunately, JavaScript added an easy way to match any individual, complete emoji via p{RGI_Emoji}. Since this is a fancy “property of strings” that can match more than one code point at a time, it requires ES2024’s flag v.

If you want to match emojis in environments without v support, check out the excellent libraries emoji-regex and emoji-regex-xs.

Making Your Regexes More Readable, Maintainable, and Resilient

Despite the improvements to regex features over the years, native JavaScript regexes of sufficient complexity can still be outrageously hard to read and maintain.

ES2018’s named capture was a great addition that made regexes more self-documenting, and ES6’s String.raw tag allows you to avoid escaping all your backslashes when using the RegExp constructor. But for the most part, that’s it in terms of readability.

However, there’s a lightweight and high-performance JavaScript library named regex (by yours truly) that makes regexes dramatically more readable. It does this by adding key missing features from Perl-Compatible Regular Expressions (PCRE) and outputting native JavaScript regexes. You can also use it as a Babel plugin, which means that regex calls are transpiled at build time, so you get a better developer experience without users paying any runtime cost.

PCRE is a popular C library used by PHP for its regex support, and it’s available in countless other programming languages and tools.

Let’s briefly look at some of the ways the regex library, which provides a template tag named regex, can help you write complex regexes that are actually understandable and maintainable by mortals. Note that all of the new syntax described below works identically in PCRE.

Insignificant Whitespace and Comments

By default, regex allows you to freely add whitespace and line comments (starting with #) to your regexes for readability.

import {regex} from 'regex';
const date = regex`
  # Match a date in YYYY-MM-DD format
  (?  d{4}) - # Year part
  (? d{2}) - # Month part
  (?   d{2})   # Day part
`;

This is equivalent to using PCRE’s xx flag.

Subroutines and Subroutine Definition Groups

Subroutines are written as g (where name refers to a named group), and they treat the referenced group as an independent subpattern that they try to match at the current position. This enables subpattern composition and reuse, which improves readability and maintainability.

For example, the following regex matches an IPv4 address such as “192.168.12.123”:

import {regex} from 'regex';
const ipv4 = regex`b
  (? 25[0-5] | 2[0-4]d | 1dd | [1-9]?d)
  # Match the remaining 3 dot-separated bytes
  (. g){3}
b`;

You can take this even further by defining subpatterns for use by reference only via subroutine definition groups. Here’s an example that improves the regex for admittance records that we saw earlier in this article:

const record = 'Admitted: 2024-01-01nReleased: 2024-01-03';
const re = regex`
  ^ Admitted: (? g) n
    Released: (? g) $

  (?(DEFINE)
    (?  g-g-g)
    (?  d{4})
    (? d{2})
    (?   d{2})
  )
`;
const match = record.match(re);
console.log(match.groups);
/* → {
  admitted: '2024-01-01',
  released: '2024-01-03'
} */

A Modern Regex Baseline

regex includes the v flag by default, so you never forget to turn it on. And in environments without native v, it automatically switches to flag u while applying v’s escaping rules, so your regexes are forward and backward-compatible.

It also implicitly enables the emulated flags x (insignificant whitespace and comments) and n (“named capture only” mode) by default, so you don’t have to continually opt into their superior modes. And since it’s a raw string template tag, you don’t have to escape your backslashes like with the RegExp constructor.

Atomic Groups and Possessive Quantifiers Can Prevent Catastrophic Backtracking

Atomic groups and possessive quantifiers are another powerful set of features added by the regex library. Although they’re primarily about performance and resilience against catastrophic backtracking (also known as ReDoS or “regular expression denial of service,” a serious issue where certain regexes can take forever when searching particular, not-quite-matching strings), they can also help with readability by allowing you to write simpler patterns.

Note: You can learn more in the regex documentation.

What’s Next? Upcoming JavaScript Regex Improvements

There are a variety of active proposals for improving regexes in JavaScript. Below, we’ll look at the three that are well on their way to being included in future editions of the language.

Duplicate Named Capturing Groups

This is a Stage 3 (nearly finalized) proposal. Even better is that, as of recently, it works in all major browsers.

When named capturing was first introduced, it required that all (?...) captures use unique names. However, there are cases when you have multiple alternate paths through a regex, and it would simplify your code to reuse the same group names in each alternative.

For example:

/(?d{4})-dd|dd-(?d{4})/

This proposal enables exactly this, preventing a “duplicate capture group name” error with this example. Note that names must still be unique within each alternative path.

Pattern Modifiers (aka Flag Groups)

This is another Stage 3 proposal. It’s already supported in Chrome/Edge 125 and Opera 111, and it’s coming soon for Firefox. No word yet on Safari.

Pattern modifiers use (?ims:...), (?-ims:...), or (?im-s:...) to turn the flags i, m, and s on or off for only certain parts of a regex.

For example:

/hello-(?i:world)/
// Matches 'hello-WORLD' but not 'HELLO-WORLD'

Escape Regex Special Characters with RegExp.escape

This proposal recently reached Stage 3 and has been a long time coming. It isn’t yet supported in any major browsers. The proposal does what it says on the tin, providing the function RegExp.escape(str), which returns the string with all regex special characters escaped so you can match them literally.

If you need this functionality today, the most widely-used package (with more than 500 million monthly npm downloads) is escape-string-regexp, an ultra-lightweight, single-purpose utility that does minimal escaping. That’s great for most cases, but if you need assurance that your escaped string can safely be used at any arbitrary position within a regex, escape-string-regexp recommends the regex library that we’ve already looked at in this article. The regex library uses interpolation to escape embedded strings in a context-aware way.

Conclusion

So there you have it: the past, present, and future of JavaScript regular expressions.

If you want to journey even deeper into the lands of regex, check out Awesome Regex for a list of the best regex testers, tutorials, libraries, and other resources. And for a fun regex crossword puzzle, try your hand at regexle.

May your parsing be prosperous and your regexes be readable.

Smashing Editorial
(gg, yk)

How To Build A Multilingual Website With Nuxt.js

How To Build A Multilingual Website With Nuxt.js

How To Build A Multilingual Website With Nuxt.js

Tim Benniks

2024-08-01T15:00:00+00:00
2025-06-20T10:32:35+00:00

This article is sponsored by Hygraph

Internationalization, often abbreviated as i18n, is the process of designing and developing software applications in a way that they can be easily adapted to various spoken languages like English, German, French, and more without requiring substantial changes to the codebase. It involves moving away from hardcoded strings and techniques for translating text, formatting dates and numbers, and handling different character encodings, among other tasks.

Internationalization can give users the choice to access a given website or application in their native language, which can have a positive impression on them, making it crucial for reaching a global audience.

What We’re Making

In this tutorial, we’re making a website that puts these i18n pieces together using a combination of libraries and a UI framework. You’ll want to have intermediate proficiency with JavaScript, Vue, and Nuxt to follow along. Throughout this article, we will learn by examples and incrementally build a multilingual Nuxt website. Together, we will learn how to provide i18n support for different languages, lazy-load locale messages, and switch locale on runtime.

After that, we will explore features like interpolation, pluralization, and date/time translations.

And finally, we will fetch dynamic localized content from an API server using Hygraph as our API server to get localized content. If you do not have a Hygraph account please create one for free before jumping in.

As a final detail, we will use Vuetify as our UI framework, but please feel free to use another framework if you want. The final code for what we’re building is published in a GitHub repository for reference. And finally, you can also take a look at the final result in a live demo.

The nuxt-i18n Library

nuxt-i18n is a library for implementing internationalization in Nuxt.js applications, and it’s what we will be using in this tutorial. The library is built on top of Vue I18n, which, again, is the de facto standard library for implementing i18n in Vue applications.

What makes nuxt-i18n ideal for our work is that it provides the comprehensive set of features included in Vue I18n while adding more functionalities that are specific to Nuxt, like lazy loading locale messages, route generation and redirection for different locales, SEO metadata per locale, locale-specific domains, and more.

Initial Setup

Start a new Nuxt.js project and set it up with a UI framework of your choice. Again, I will be using Vue to establish the interface for this tutorial.

Let us add a basic layout for our website and set up some sample Vue templates.

First, a “Blog” page:


Home This is the home page description

Next, an “About” page:


About This is the about page description

This gives us a bit of a boilerplate that we can integrate our i18n work into.

Translating Plain Text

The page templates look good, but notice how the text is hardcoded. As far as i18n goes, hardcoded content is difficult to translate into different locales. That is where the nuxt-i18n library comes in, providing the language-specific strings we need for the Vue components in the templates.

We’ll start by installing the library via the command line:

npx nuxi@latest module add i18n

Inside the nuxt.config.ts file, we need to ensure that we have @nuxtjs/i18n inside the modules array. We can use the i18n property to provide module-specific configurations.

// nuxt.config.ts
export default defineNuxtConfig({
  // ...
  modules: [
    ...
    "@nuxtjs/i18n",
    // ...
  ],
  i18n: {
    // nuxt-i18n module configurations here
  }
  // ...
});

Since the nuxt-i18n library is built on top of the Vue I18n library, we can utilize its features in our Nuxt application as well. Let us create a new file, i18n.config.ts, which we will use to provide all vue-i18n configurations.

// i18n.config.ts
export default defineI18nConfig(() => ({
  legacy: false,
  locale: "en",
  messages: {
    en: {
      homePage: {
        title: "Home",
        description: "This is the home page description."
      },
      aboutPage: {
        title: "About",
        description: "This is the about page description."
      },
    },
  },
}));

Here, we have specified internationalization configurations, like using the en locale, and added messages for the en locale. These messages can be used inside the markup in the templates we made with the help of a $t function from Vue I18n.

Next, we need to link the i18n.config.ts configurations in our Nuxt config file.

// nuxt.config.ts
export default defineNuxtConfig({
  ...
  i18n: {
    vueI18n: "./i18n.config.ts"
  }
  ...
});

Now, we can use the $t function in our components — as shown below — to parse strings from our internationalization configurations.

Note: There’s no need to import $t since we have Nuxt’s default auto-import functionality.


{{ $t("homePage.title") }} {{ $t("homePage.description") }}

Page with a title and description

(Large preview)

Lazy Loading Translations

We have the title and description served from the configurations. Next, we can add more languages to the same config. For example, here’s how we can establish translations for English (en), French (fr) and Spanish (es):

// i18n.config.ts
export default defineI18nConfig(() => ({
  legacy: false,
  locale: "en",
  messages: {
    en: {
      // English
    },
    fr: {
      // French
    },
    es: {
      // Spanish
    }
  },
}));

For a production website with a lot of content that needs translating, it would be unwise to bundle all of the messages from different locales in the main bundle. Instead, we should use the nuxt-i18 lazy loading feature asynchronously load only the required language rather than all of them at once. Also, having messages for all locales in a single configuration file can become difficult to manage over time, and breaking them up like this makes things easier to find.

Let’s set up the lazy loading feature in nuxt.config.ts:

// etc.
  i18n: {
    vueI18n: "./i18n.config.ts",
    lazy: true,
    langDir: "locales",
    locales: [
      {
        code: "en",
        file: "en.json",
        name: "English",
      },
      {
        code: "es",
        file: "es.json",
        name: "Spanish",
      },
      {
        code: "fr",
        file: "fr.json",
        name: "French",
      },
    ],
    defaultLocale: "en",
    strategy: "no_prefix",
  },

// etc.

This enables lazy loading and specifies the locales directory that will contain our locale files. The locales array configuration specifies from which files Nuxt.js should pick up messages for a specific language.

Now, we can create individual files for each language. I’ll drop all three of them right here:


// locales/en.json
{
  "homePage": {
    "title": "Home",
    "description": "This is the home page description."
  },
  "aboutPage": {
    "title": "About",
    "description": "This is the about page description."
  },
  "selectLocale": {
    "label": "Select Locale"
  },
  "navbar": {
    "homeButton": "Home",
    "aboutButton": "About"
  }
}
// locales/fr.json
{
  "homePage": {
    "title": "Bienvenue sur la page d'accueil",
    "description": "Ceci est la description de la page d'accueil."
  },
  "aboutPage": {
    "title": "À propos de nous",
    "description": "Ceci est la description de la page à propos de nous."
  },
  "selectLocale": {
    "label": "Sélectionner la langue"
  },
  "navbar": {
    "homeButton": "Accueil",
    "aboutButton": "À propos"
  }
}
// locales/es.json
{
  "homePage": {
    "title": "Bienvenido a la página de inicio",
    "description": "Esta es la descripción de la página de inicio."
  },
  "aboutPage": {
    "title": "Sobre nosotros",
    "description": "Esta es la descripción de la página sobre nosotros."
  },
  "selectLocale": {
    "label": "Seleccione el idioma"
  },
  "navbar": {
    "homeButton": "Inicio",
    "aboutButton": "Acerca de"
  }
}

We have set up lazy loading, added multiple languages to our application, and moved our locale messages to separate files. The user gets the right locale for the right message, and the locale messages are kept in a maintainable manner inside the code base.

Switching Between Languages

We have different locales, but to see them in action, we will build a component that can be used to switch between the available locales.


const { locale, locales, setLocale } = useI18n();

const language = computed({
  get: () => locale.value,
  set: (value) => setLocale(value),
});


This component uses the useI18n hook provided by the Vue I18n library and a computed property language to get and set the global locale from a input. To make this even more like a real-world website, we’ll include a small navigation bar that links up all of the website’s pages.


{{ $t("navbar.homeButton") }} {{ $t("navbar.aboutButton") }}

That’s it! Now, we can switch between languages on the fly.

Showing the current state of the homepage.

Showing the current state of the homepage. (Large preview)

Homepage showing a French translation.

Showing a French translation. (Large preview)

We have a basic layout, but I thought we’d take this a step further and build a playground page we can use to explore more i18n features that are pretty useful when building a multilingual website.

Interpolation and Pluralization

Interpolation and pluralization are internationalization techniques for handling dynamic content and grammatical variations across different languages. Interpolation allows developers to insert dynamic variables or expressions into translated strings. Pluralization addresses the complexities of plural forms in languages by selecting the appropriate grammatical form based on numeric values. With the help of interpolation and pluralization, we can create more natural and accurate translations.

To use pluralization in our Nuxt app, we’ll first add a configuration to the English locale file.

// locales/en.json
{
  // etc.
  "playgroundPage": {
    "pluralization": {
      "title": "Pluralization",
      "apple": "No Apple | One Apple | {count} Apples",
      "addApple": "Add"
    }
  }
  // etc.
}

The pluralization configuration set up for the key apple defines an output — No Apple — if a count of 0 is passed to it, a second output — One Apple — if a count of 1 is passed, and a third — 2 Apples, 3 Apples, and so on — if the count passed in is greater than 1.

Here is how we can use it in your component: Whenever you click on the add button, you will see pluralization in action, changing the strings.


let appleCount = ref(0);
const addApple = () => {
  appleCount.value += 1;
};


        {{ $t("playgroundPage.pluralization.title") }}


        {{ $t("playgroundPage.pluralization.apple", { count: appleCount }) }}
      
      
        {{ $t("playgroundPage.pluralization.addApple") }}


To use interpolation in our Nuxt app, first, add a configuration in the English locale file:

// locales/en.json
{
  ...
  "playgroundPage": {
    ... 
    "interpolation": {
      "title": "Interpolation",
      "sayHello": "Hello, {name}",
      "hobby": "My favourite hobby is {0}.",
      "email": "You can reach out to me at {account}{'@'}{domain}.com"
    },
    // etc. 
  }
  // etc.
}

The message for sayHello expects an object passed to it having a key name when invoked — a process known as named interpolation.

The message hobby expects an array to be passed to it and will pick up the 0th element, which is known as list interpolation.

The message email expects an object with keys account, and domain and joins both with a literal string "@". This is known as literal interpolation.

Below is an example of how to use it in the Vue components:


        {{ $t("playgroundPage.interpolation.title") }}


{{ $t("playgroundPage.interpolation.sayHello", { name: "Jane", }) }}

{{ $t("playgroundPage.interpolation.hobby", ["Football", "Cricket"]) }}

{{ $t("playgroundPage.interpolation.email", { account: "johndoe", domain: "hygraph", }) }}

Exampe of pluralization and interpolation

(Large preview)

Date & Time Translations

Translating dates and times involves translating date and time formats according to the conventions of different locales. We can use Vue I18n’s features for formatting date strings, handling time zones, and translating day and month names for managing date time translations. We can give the configuration for the same using the datetimeFormats key inside the vue-i18n config object.

// i18n.config.ts
export default defineI18nConfig(() => ({
  fallbackLocale: "en",
  datetimeFormats: {
    en: {
      short: {
        year: "numeric",
        month: "short",
        day: "numeric",
      },
      long: {
        year: "numeric",
        month: "short",
        day: "numeric",
        weekday: "short",
        hour: "numeric",
        minute: "numeric",
        hour12: false,
      },
    },
    fr: {
      short: {
        year: "numeric",
        month: "short",
        day: "numeric",
      },
      long: {
        year: "numeric",
        month: "short",
        day: "numeric",
        weekday: "long",
        hour: "numeric",
        minute: "numeric",
        hour12: true,
      },
    },
    es: {
      short: {
        year: "numeric",
        month: "short",
        day: "numeric",
      },
      long: {
        year: "2-digit",
        month: "short",
        day: "numeric",
        weekday: "long",
        hour: "numeric",
        minute: "numeric",
        hour12: true,
      },
    },
  },
}));

Here, we have set up short and long formats for all three languages. If you are coding along, you will be able to see available configurations for fields, like month and year, thanks to TypeScript and Intellisense features provided by your code editor. To display the translated dates and times in components, we should use the $d function and pass the format to it.


        {{ $t("playgroundPage.dateTime.title") }}


Short: {{ (new Date(), $d(new Date(), "short")) }}

Long: {{ (new Date(), $d(new Date(), "long")) }}

Showing a default date and time.

Showing a default date and time. (Large preview)

Showing the date and time translated in Spanish.

Showing the date and time translated in Spanish. (Large preview)

Localization On the Hygraph Side

We saw how to implement localization with static content. Now, we’ll attempt to understand how to fetch dynamic localized content in Nuxt.

We can build a blog page in our Nuxt App that fetches data from a server. The server API should accept a locale and return data in that specific locale.

Hygraph has a flexible localization API that allows you to publish and query localized content. If you haven’t created a free Hygraph account yet, you can do that on the Hygraph website to continue following along.

Go to Project SettingsLocales and add locales for the API.

Showing Locales on the Hygraph website

(Large preview)

We have added two locales: English and French. Now we need aq localized_post model in our schema that only two fields: title and body. Ensure to make these “Localized” fields while creating them.

Showing Schema, which has title and body fields, on the Htygraph website

(Large preview)

Add permissions to consume the localized content, go to Project settingsAccessAPI AccessPublic Content API, and assign Read permissions to the localized_post model.

Project settings on the Htygraph website with Public Content API and an assigned Read permission

(Large preview)

Now, we can go to the Hygrapgh API playground and add some localized data to the database with the help of GraphQL mutations. To limit the scope of this example, I am simply adding data from the Hygraph API playground. In an ideal world, a create/update mutation would be triggered from the front end after receiving user input.

Run this mutation in the Hygraph API playground:

mutation createLocalizedPost {
  createLocalizedPost(
    data: {
      title: "A Journey Through the Alps", 
      body: "Exploring the majestic mountains of the Alps offers a thrilling experience. The stunning landscapes, diverse wildlife, and pristine environment make it a perfect destination for nature lovers.", 
      localizations: {
        create: [
          {locale: fr, data: {title: "Un voyage à travers les Alpes", body: "Explorer les majestueuses montagnes des Alpes offre une expérience palpitante. Les paysages époustouflants, la faune diversifiée et l'environnement immaculé en font une destination parfaite pour les amoureux de la nature."}}
        ]
      }
    }
  ) {
    id
  }
}

The mutation above creates a post with the en locale and includes a fr version of the same post. Feel free to add more data to your model if you want to see things work from a broader set of data.

Putting Things Together

Now that we have Hygraph API content ready for consumption let’s take a moment to understand how it’s consumed inside the Nuxt app.

To do this, we’ll install nuxt-graphql-client to serve as the app’s GraphQL client. This is a minimal GraphQL client for performing GraphQL operations without having to worry about complex configurations, code generation, typing, and other setup tasks.

npx nuxi@latest module add graphql-client
// nuxt.config.ts
export default defineNuxtConfig({
  modules: [
    // ...
    "nuxt-graphql-client"
    // ...
  ],
  runtimeConfig: {
    public: {
      GQL_HOST: 'ADD_YOUR_GQL_HOST_URL_HERE_OR_IN_.env'
    }
  },
});

Next, let’s add our GraphQL queries in graphql/queries.graphql.

query getPosts($locale: [Locale!]!) {
  localizedPosts(locales: $locale) {
    title
    body
  }
}

The GraphQL client will automatically scan .graphql and .gql files and generate client-side code and typings in the .nuxt/gql folder. All we need to do is stop and restart the Nuxt application. After restarting the app, the GraphQL client will allow us to use a GqlGetPosts function to trigger the query.

Now, we will build the Blog page where by querying the Hygraph server and showing the dynamic data.

// pages/blog.vue

  import type { GetPostsQueryVariables } from "#gql";
  import type { PostItem, Locale } from "../types/types";

  const { locale } = useI18n();
  const posts = ref([]);
  const isLoading = ref(false);
  const isError = ref(false);

  const fetchPosts = async (localeValue: Locale) => {
    try {
      isLoading.value = true;
      const variables: GetPostsQueryVariables = {
        locale: [localeValue],
      };
      const data = await GqlGetPosts(variables);
      posts.value = data?.localizedPosts ?? [];
    } catch (err) {
      console.log("Fetch Error, Something went wrong", err);
      isError.value = true;
    } finally {
      isLoading.value = false;
    }
  };

  // Fetch posts on component mount
  onMounted(() => {
    fetchPosts(locale.value as Locale);
  });

  // Watch for locale changes
  watch(locale, (newLocale) => {
    fetchPosts(newLocale as Locale);
  });

This code fetches only the current locale from the useI18n hook and sends it to the fetchPosts function when the Vue component is mounted. The fetchPosts function will pass the locale to the GraphQL query as a variable and obtain localized data from the Hygraph server. We also have a watcher on the locale so that whenever the global locale is changed by the user we make an API call to the server again and fetch posts in that locale.

And, finally, let’s add markup for viewing our fetched data!


    Blogs
    

Something went wrong while getting blogs please check the logs.

{{ post.title }} {{ post.body }}

Awesome! If all goes according to plan, then your app should look something like the one in the following video.

Wrapping Up

Check that out — we just made the functionality for translating content for a multilingual website! Now, a user can select a locale from a list of options, and the app fetches content for the selected locale and automatically updates the displayed content.

Did you think that translations would require more difficult steps? It’s pretty amazing that we’re able to cobble together a couple of libraries, hook them up to an API, and wire everything up to render on a page.

Of course, there are other libraries and resources for handling internationalization in a multilingual context. The exact tooling is less the point than it is seeing what pieces are needed to handle dynamic translations and how they come together.

Smashing Editorial
(gg, yk)

Uniting Web And Native Apps With 4 Unknown JavaScript APIs

Uniting Web And Native Apps With 4 Unknown JavaScript APIs

Uniting Web And Native Apps With 4 Unknown JavaScript APIs

Juan Diego Rodríguez

2024-06-20T18:00:00+00:00
2025-06-20T10:32:35+00:00

A couple of years ago, four JavaScript APIs that landed at the bottom of awareness in the State of JavaScript survey. I took an interest in those APIs because they have so much potential to be useful but don’t get the credit they deserve. Even after a quick search, I was amazed at how many new web APIs have been added to the ECMAScript specification that aren’t getting their dues and with a lack of awareness and browser support in browsers.

That situation can be a “catch-22”:

An API is interesting but lacks awareness due to incomplete support, and there is no immediate need to support it due to low awareness.

Most of these APIs are designed to power progressive web apps (PWA) and close the gap between web and native apps. Bear in mind that creating a PWA involves more than just adding a manifest file. Sure, it’s a PWA by definition, but it functions like a bookmark on your home screen in practice. In reality, we need several APIs to achieve a fully native app experience on the web. And the four APIs I’d like to shed light on are part of that PWA puzzle that brings to the web what we once thought was only possible in native apps.

You can see all these APIs in action in this demo as we go along.

1. Screen Orientation API

The Screen Orientation API can be used to sniff out the device’s current orientation. Once we know whether a user is browsing in a portrait or landscape orientation, we can use it to enhance the UX for mobile devices by changing the UI accordingly. We can also use it to lock the screen in a certain position, which is useful for displaying videos and other full-screen elements that benefit from a wider viewport.

Using the global screen object, you can access various properties the screen uses to render a page, including the screen.orientation object. It has two properties:

  • type: The current screen orientation. It can be: "portrait-primary", "portrait-secondary", "landscape-primary", or "landscape-secondary".
  • angle: The current screen orientation angle. It can be any number from 0 to 360 degrees, but it’s normally set in multiples of 90 degrees (e.g., 0, 90, 180, or 270).

On mobile devices, if the angle is 0 degrees, the type is most often going to evaluate to "portrait" (vertical), but on desktop devices, it is typically "landscape" (horizontal). This makes the type property precise for knowing a device’s true position.

The screen.orientation object also has two methods:

  • .lock(): This is an async method that takes a type value as an argument to lock the screen.
  • .unlock(): This method unlocks the screen to its default orientation.

And lastly, screen.orientation counts with an "orientationchange" event to know when the orientation has changed.

Browser Support

Browser Support on Screen Orientation API

Source: Caniuse. (Large preview)

Finding And Locking Screen Orientation

Let’s code a short demo using the Screen Orientation API to know the device’s orientation and lock it in its current position.

This can be our HTML boilerplate:

Orientation Type:
Orientation Angle:

On the JavaScript side, we inject the screen orientation type and angle properties into our HTML.

let currentOrientationType = document.querySelector(".orientation-type");
let currentOrientationAngle = document.querySelector(".orientation-angle");

currentOrientationType.textContent = screen.orientation.type;
currentOrientationAngle.textContent = screen.orientation.angle;

Now, we can see the device’s orientation and angle properties. On my laptop, they are "landscape-primary" and .

Screen Orientation type and angle being displayed

(Large preview)

If we listen to the window’s orientationchange event, we can see how the values are updated each time the screen rotates.

window.addEventListener("orientationchange", () => {
  currentOrientationType.textContent = screen.orientation.type;
  currentOrientationAngle.textContent = screen.orientation.angle;
});

Screen Orientation type and angle are displayed in portrait mode

(Large preview)

To lock the screen, we need to first be in full-screen mode, so we will use another extremely useful feature: the Fullscreen API. Nobody wants a webpage to pop into full-screen mode without their consent, so we need transient activation (i.e., a user click) from a DOM element to work.

The Fullscreen API has two methods:

  1. Document.exitFullscreen() is used from the global document object,
  2. Element.requestFullscreen() makes the specified element and its descendants go full-screen.

We want the entire page to be full-screen so we can invoke the method from the root element at the document.documentElement object:

const fullscreenButton = document.querySelector(".fullscreen-button");

fullscreenButton.addEventListener("click", async () => {
  // If it is already in full-screen, exit to normal view
  if (document.fullscreenElement) {
    await document.exitFullscreen();
  } else {
    await document.documentElement.requestFullscreen();
  }
});

Next, we can lock the screen in its current orientation:

const lockButton = document.querySelector(".lock-button");

lockButton.addEventListener("click", async () => {
  try {
    await screen.orientation.lock(screen.orientation.type);
  } catch (error) {
    console.error(error);
  }
});

And do the opposite with the unlock button:

const unlockButton = document.querySelector(".unlock-button");

unlockButton.addEventListener("click", () => {
  screen.orientation.unlock();
});

Can’t We Check Orientation With a Media Query?

Yes! We can indeed check page orientation via the orientation media feature in a CSS media query. However, media queries compute the current orientation by checking if the width is “bigger than the height” for landscape or “smaller” for portrait. By contrast,

The Screen Orientation API checks for the screen rendering the page regardless of the viewport dimensions, making it resistant to inconsistencies that may crop up with page resizing.

You may have noticed how PWAs like Instagram and X force the screen to be in portrait mode even when the native system orientation is unlocked. It is important to notice that this behavior isn’t achieved through the Screen Orientation API, but by setting the orientation property on the manifest.json file to the desired orientation type.

2. Device Orientation API

Another API I’d like to poke at is the Device Orientation API. It provides access to a device’s gyroscope sensors to read the device’s orientation in space; something used all the time in mobile apps, mainly games. The API makes this happen with a deviceorientation event that triggers each time the device moves. It has the following properties:

  • event.alpha: Orientation along the Z-axis, ranging from 0 to 360 degrees.
  • event.beta: Orientation along the X-axis, ranging from -180 to 180 degrees.
  • event.gamma: Orientation along the Y-axis, ranging from -90 to 90 degrees.

Browser Support

Browser Support on Device Orientation API

Source: Caniuse. (Large preview)

Moving Elements With Your Device

In this case, we will make a 3D cube with CSS that can be rotated with your device! The full instructions I used to make the initial CSS cube are credited to David DeSandro and can be found in his introduction to 3D transforms.

See the Pen [Rotate cube [forked]](https://codepen.io/smashingmag/pen/vYwdMNJ) by Dave DeSandro.

See the Pen Rotate cube [forked] by Dave DeSandro.

You can see raw full HTML in the demo, but let’s print it here for posterity:

1
2
3
4
5
6

Device Orientation API

Alpha:
Beta:
Gamma:

To keep this brief, I won’t explain the CSS code here. Just keep in mind that it provides the necessary styles for the 3D cube, and it can be rotated through all axes using the CSS rotate() function.

Now, with JavaScript, we listen to the window’s deviceorientation event and access the event orientation data:

const currentAlpha = document.querySelector(".currentAlpha");
const currentBeta = document.querySelector(".currentBeta");
const currentGamma = document.querySelector(".currentGamma");

window.addEventListener("deviceorientation", (event) => {
  currentAlpha.textContent = event.alpha;
  currentBeta.textContent = event.beta;
  currentGamma.textContent = event.gamma;
});

To see how the data changes on a desktop device, we can open Chrome’s DevTools and access the Sensors Panel to emulate a rotating device.

Emulating a device rotating on the Chrome DevTools Sensor Panel

(Large preview)

To rotate the cube, we change its CSS transform properties according to the device orientation data:

const currentAlpha = document.querySelector(".currentAlpha");
const currentBeta = document.querySelector(".currentBeta");
const currentGamma = document.querySelector(".currentGamma");

const cube = document.querySelector(".cube");

window.addEventListener("deviceorientation", (event) => {
  currentAlpha.textContent = event.alpha;
  currentBeta.textContent = event.beta;
  currentGamma.textContent = event.gamma;

  cube.style.transform = `rotateX(${event.beta}deg) rotateY(${event.gamma}deg) rotateZ(${event.alpha}deg)`;
});

This is the result:

Cube rotated according to emulated device orientation

(Large preview)

3. Vibration API

Let’s turn our attention to the Vibration API, which, unsurprisingly, allows access to a device’s vibrating mechanism. This comes in handy when we need to alert users with in-app notifications, like when a process is finished or a message is received. That said, we have to use it sparingly; no one wants their phone blowing up with notifications.

There’s just one method that the Vibration API gives us, and it’s all we need: navigator.vibrate().

vibrate() is available globally from the navigator object and takes an argument for how long a vibration lasts in milliseconds. It can be either a number or an array of numbers representing a patron of vibrations and pauses.

navigator.vibrate(200); // vibrate 200ms
navigator.vibrate([200, 100, 200]); // vibrate 200ms, wait 100, and vibrate 200ms.

Browser Support

Browser Support on Vibration API

Source: Caniuse. (Large preview)

Vibration API Demo

Let’s make a quick demo where the user inputs how many milliseconds they want their device to vibrate and buttons to start and stop the vibration, starting with the markup:

We’ll add an event listener for a click and invoke the vibrate() method:

const vibrateButton = document.querySelector(".vibrate-button");
const millisecondsInput = document.querySelector("#milliseconds-input");

vibrateButton.addEventListener("click", () => {
  navigator.vibrate(millisecondsInput.value);
});

To stop vibrating, we override the current vibration with a zero-millisecond vibration.

const stopVibrateButton = document.querySelector(".stop-vibrate-button");

stopVibrateButton.addEventListener("click", () => {
  navigator.vibrate(0);
});

4. Contact Picker API

In the past, it used to be that only native apps could connect to a device’s “contacts”. But now we have the fourth and final API I want to look at: the Contact Picker API.

The API grants web apps access to the device’s contact lists. Specifically, we get the contacts.select() async method available through the navigator object, which takes the following two arguments:

  • properties: This is an array containing the information we want to fetch from a contact card, e.g., "name", "address", "email", "tel", and "icon".
  • options: This is an object that can only contain the multiple boolean property to define whether or not the user can select one or multiple contacts at a time.

Browser Support

I’m afraid that browser support is next to zilch on this one, limited to Chrome Android, Samsung Internet, and Android’s native web browser at the time I’m writing this.

Browser Support on Contacts Manager API

Source: Caniuse. (Large preview)

Selecting User’s Contacts

We will make another demo to select and display the user’s contacts on the page. Again, starting with the HTML:

Contacts:

Then, in JavaScript, we first construct our elements from the DOM and choose which properties we want to pick from the contacts.

const getContactsButton = document.querySelector(".get-contacts");
const contactList = document.querySelector(".contact-list");

const props = ["name", "tel", "icon"];
const options = {multiple: true};

Now, we asynchronously pick the contacts when the user clicks the getContactsButton.


const getContacts = async () => {
  try {
    const contacts = await navigator.contacts.select(props, options);
  } catch (error) {
    console.error(error);
  }
};

getContactsButton.addEventListener("click", getContacts);

Using DOM manipulation, we can then append a list item to each contact and an icon to the contactList element.

const appendContacts = (contacts) => {
  contacts.forEach(({name, tel, icon}) => {
    const contactElement = document.createElement("li");

    contactElement.innerText = `${name}: ${tel}`;
    contactList.appendChild(contactElement);
  });
};

const getContacts = async () => {
  try {
    const contacts = await navigator.contacts.select(props, options);
    appendContacts(contacts);
  } catch (error) {
    console.error(error);
  }
};

getContactsButton.addEventListener("click", getContacts);

Appending an image is a little tricky since we will need to convert it into a URL and append it for each item in the list.

const getIcon = (icon) => {
  if (icon.length > 0) {
    const imageUrl = URL.createObjectURL(icon[0]);
    const imageElement = document.createElement("img");
    imageElement.src = imageUrl;

    return imageElement;
  }
};

const appendContacts = (contacts) => {
  contacts.forEach(({name, tel, icon}) => {
    const contactElement = document.createElement("li");

    contactElement.innerText = `${name}: ${tel}`;
    contactList.appendChild(contactElement);

    const imageElement = getIcon(icon);
    contactElement.appendChild(imageElement);
  });
};

const getContacts = async () => {
  try {
    const contacts = await navigator.contacts.select(props, options);
    appendContacts(contacts);
  } catch (error) {
    console.error(error);
  }
};

getContactsButton.addEventListener("click", getContacts);

And here’s the outcome:

Contact Picker showing three mock contacts

(Large preview)

Note: The Contact Picker API will only work if the context is secure, i.e., the page is served over https:// or wss:// URLs.

Conclusion

There we go, four web APIs that I believe would empower us to build more useful and robust PWAs but have slipped under the radar for many of us. This is, of course, due to inconsistent browser support, so I hope this article can bring awareness to new APIs so we have a better chance to see them in future browser updates.

Aren’t they interesting? We saw how much control we have with the orientation of a device and its screen as well as the level of access we get to access a device’s hardware features, i.e. vibration, and information from other apps to use in our own UI.

But as I said much earlier, there’s a sort of infinite loop where a lack of awareness begets a lack of browser support. So, while the four APIs we covered are super interesting, your mileage will inevitably vary when it comes to using them in a production environment. Please tread cautiously and refer to Caniuse for the latest support information, or check for your own devices using WebAPI Check.

Smashing Editorial
(gg, yk)

The Era Of Platform Primitives Is Finally Here

The Era Of Platform Primitives Is Finally Here

The Era Of Platform Primitives Is Finally Here

Atila Fassina

2024-05-28T12:00:00+00:00
2025-06-20T10:32:35+00:00

This article is sponsored by Netlify

In the past, the web ecosystem moved at a very slow pace. Developers would go years without a new language feature or working around a weird browser quirk. This pushed our technical leaders to come up with creative solutions to circumvent the platform’s shortcomings. We invented bundling, polyfills, and transformation steps to make things work everywhere with less of a hassle.

Slowly, we moved towards some sort of consensus on what we need as an ecosystem. We now have TypeScript and Vite as clear preferences—pushing the needle of what it means to build consistent experiences for the web. Application frameworks have built whole ecosystems on top of them: SolidStart, Nuxt, Remix, and Analog are examples of incredible tools built with such primitives. We can say that Vite and TypeScript are tooling primitives that empower the creation of others in diverse ecosystems.

With bundling and transformation needs somewhat defined, it was only natural that framework authors would move their gaze to the next layer they needed to abstract: the server.

Server Primitives

The UnJS folks have been consistently building agnostic tooling that can be reused in different ecosystems. Thanks to them, we now have frameworks and libraries such as H3 (a minimal Node.js server framework built with TypeScript), which enables Nitro (a whole server runtime powered by Vite, and H3), that in its own turn enabled Vinxi (an application bundler and server runtime that abstracts Nitro and Vite).

Nitro is used already by three major frameworks: Nuxt, Analog, and SolidStart. While Vinxi is also used by SolidStart. This means that any platform which supports one of these, will definitely be able to support the others with zero additional effort.

This is not about taking a bigger slice of the cake. But making the cake bigger for everyone.

Frameworks, platforms, developers, and users benefit from it. We bet on our ecosystem together instead of working in silos with our monolithic solutions. Empowering our developer-users to gain transferable skills and truly choose the best tool for the job with less vendor lock-in than ever before.

Serverless Rejoins Conversation

Such initiatives have probably been noticed by serverless platforms like Netlify. With Platform Primitives, frameworks can leverage agnostic solutions for common necessities such as Incremental Static Regeneration (ISR), Image Optimization, and key/value (kv) storage.

As the name implies, Netlify Platform Primitives are a group of abstractions and helpers made available at a platform level for either frameworks or developers to leverage when using their applications. This brings additional functionality simultaneously to every framework. This is a big and powerful shift because, up until now, each framework would have to create its own solutions and backport such strategies to compatibility layers within each platform.

Moreover, developers would have to wait for a feature to first land on a framework and subsequently for support to arrive in their platform of choice. Now, as long as they’re using Netlify, those primitives are available directly without any effort and time put in by the framework authors. This empowers every ecosystem in a single measure.

Serverless means server infrastructure developers don’t need to handle. It’s not a misnomer, but a format of Infrastructure As A Service.

As mentioned before, Netlify Platform Primitives are three different features:

  1. Image CDN
    A content delivery network for images. It can handle format transformation and size optimization via URL query strings.
  2. Caching
    Basic primitives for their server runtime that help manage the caching directives for browser, server, and CDN runtimes smoothly.
  3. Blobs
    A key/value (KV) storage option is automatically available to your project through their SDK.

Let’s take a quick dive into each of these features and explore how they can increase our productivity with a serverless fullstack experience.

Image CDN

Every image in a /public can be served through a Netlify function. This means it’s possible to access it through a /.netlify/images path. So, without adding sharp or any image optimization package to your stack, deploying to Netlify allows us to serve our users with a better format without transforming assets at build-time. In a SolidStart, in a few lines of code, we could have an Image component that transforms other formats to .webp.

import { type JSX } from "solid-js";

const SITE_URL = "https://example.com";

interface Props extends JSX.ImgHTMLAttributes {
  format?: "webp" | "jpeg" | "png" | "avif" | "preserve";
  quality?: number | "preserve";
}

const getQuality = (quality: Props["quality"]) => {
  if (quality === "preserve") return"";
  return `&q=${quality || "75"}`;
};

function getFormat(format: Props["format"]) {
  switch (format) {
    case "preserve":
      return"  ";
    case "jpeg":
      return `&fm=jpeg`;
    case "png":
      return `&fm=png`;
    case "avif":
      return `&fm=avif`;
    case "webp":
    default:
      return `&fm=webp`;
  }
}

export function Image(props: Props) {
  return (
    
  );
}

Notice the above component is even slightly more complex than bare essentials because we’re enforcing some default optimizations. Our getFormat method transforms images to .webp by default. It’s a broadly supported format that’s significantly smaller than the most common and without any loss in quality. Our get quality function reduces the image quality to 75% by default; as a rule of thumb, there isn’t any perceivable loss in quality for large images while still providing a significant size optimization.

Caching

By default, Netlify caching is quite extensive for your regular artifacts – unless there’s a new deployment or the cache is flushed manually, resources will last for 365 days. However, because server/edge functions are dynamic in nature, there’s no default caching to prevent serving stale content to end-users. This means that if you have one of these functions in production, chances are there’s some caching to be leveraged to reduce processing time (and expenses).

By adding a cache-control header, you already have done 80% of the work in optimizing your resources for best serving users. Some commonly used cache control directives:

{
  "cache-control": "public, max-age=0, stale-while-revalidate=86400"

}
  • public: Store in a shared cache.
  • max-age=0: resource is immediately stale.
  • stale-while-revalidate=86400: if the cache is stale for less than 1 day, return the cached value and revalidate it in the background.
{
  "cache-control": "public, max-age=86400, must-revalidate"

}
  • public: Store in a shared cache.
  • max-age=86400: resource is fresh for one day.
  • must-revalidate: if a request arrives when the resource is already stale, the cache must be revalidated before a response is sent to the user.

Note: For more extensive information about possible compositions of Cache-Control directives, check the mdn entry on Cache-Control.

The cache is a type of key/value storage. So, once our responses are set with proper cache control, platforms have some heuristics to define what the key will be for our resource within the cache storage. The Web Platform has a second very powerful header that can dictate how our cache behaves.

The Vary response header is composed of a list of headers that will affect the validity of the resource (method and the endpoint URL are always considered; no need to add them). This header allows platforms to define other headers defined by location, language, and other patterns that will define for how long a response can be considered fresh.

The Vary response header is a foundational piece of a special header in Netlify Caching Primitive. The Netlify-Vary will take a set of instructions on which parts of the request a key should be based. It is possible to tune a response key not only by the header but also by the value of the header.

  • query: vary by the value of some or all request query parameters.
  • header: vary by the value of one or more request headers.
  • language: vary by the languages from the Accept-Language header.
  • country: vary by the country inferred from a GeoIP lookup on the request IP address.
  • cookie: vary by the value of one or more request cookie keys.

This header offers strong fine-control over how your resources are cached. Allowing for some creative strategies to optimize how your app will perform for specific users.

Blob Storage

This is a highly-available key/value store, it’s ideal for frequent reads and infrequent writes. They’re automatically available and provisioned for any Netlify Project.

It’s possible to write on a blob from your runtime or push data for a deployment-specific store. For example, this is how an Action Function would register a number of likes in store with SolidStart.

import { getStore } from "@netlify/blobs";
import { action } from "@solidjs/router";

export const upVote = action(async (formData: FormData) => {
  "use server";

  const postId = formData.get("id");
  const postVotes = formData.get("votes");

  if (typeof postId !== "string" || typeof postVotes !== "string") return;

  const store = getStore("posts");
  const voteSum = Number(postVotes) + 1)
    
  await store.set(postId, String(voteSum);

  console.log("done");
  return voteSum
  
});

Final Thoughts

With high-quality primitives, we can enable library and framework creators to create thin integration layers and adapters. This way, instead of focusing on how any specific platform operates, it will be possible to focus on the actual user experience and practical use-cases for such features. Monoliths and deeply integrated tooling make sense to build platforms fast with strong vendor lock-in, but that’s not what the community needs. Betting on the web platform is a more sensible and future-friendly way.

Let me know in the comments what your take is about unbiased tooling versus opinionated setups!

Smashing Editorial
(il)

Converting Plain Text To Encoded HTML With Vanilla JavaScript

Converting Plain Text To Encoded HTML With Vanilla JavaScript

Converting Plain Text To Encoded HTML With Vanilla JavaScript

Alexis Kypridemos

2024-04-17T13:00:00+00:00
2025-06-20T10:32:35+00:00

When copying text from a website to your device’s clipboard, there’s a good chance that you will get the formatted HTML when pasting it. Some apps and operating systems have a “Paste Special” feature that will strip those tags out for you to maintain the current style, but what do you do if that’s unavailable?

Same goes for converting plain text into formatted HTML. One of the closest ways we can convert plain text into HTML is writing in Markdown as an abstraction. You may have seen examples of this in many comment forms in articles just like this one. Write the comment in Markdown and it is parsed as HTML.

Even better would be no abstraction at all! You may have also seen (and used) a number of online tools that take plainly written text and convert it into formatted HTML. The UI makes the conversion and previews the formatted result in real time.

Providing a way for users to author basic web content — like comments — without knowing even the first thing about HTML, is a novel pursuit as it lowers barriers to communicating and collaborating on the web. Saying it helps “democratize” the web may be heavy-handed, but it doesn’t conflict with that vision!

Smashing Magazine comment form that is displayed at the end of articles. It says to leave a comment, followed by instructions for Markdown formatting and a form text area.

Smashing Magazine’s comment form includes instructions for formatting a comment in Markdown syntax. (Large preview)

We can build a tool like this ourselves. I’m all for using existing resources where possible, but I’m also for demonstrating how these things work and maybe learning something new in the process.

Defining The Scope

There are plenty of assumptions and considerations that could go into a plain-text-to-HTML converter. For example, should we assume that the first line of text entered into the tool is a title that needs corresponding

tags? Is each new line truly a paragraph, and how does linking content fit into this?

Again, the idea is that a user should be able to write without knowing Markdown or HTML syntax. This is a big constraint, and there are far too many HTML elements we might encounter, so it’s worth knowing the context in which the content is being used. For example, if this is a tool for writing blog posts, then we can limit the scope of which elements are supported based on those that are commonly used in long-form content:

,

, , and . In other words, it will be possible to include top-level headings, body text, linked text, and images. There will be no support for bulleted or ordered lists, tables, or any other elements for this particular tool.

The front-end implementation will rely on vanilla HTML, CSS, and JavaScript to establish a small form with a simple layout and functionality that converts the text to HTML. There is a server-side aspect to this if you plan on deploying it to a production environment, but our focus is purely on the front end.

Looking At Existing Solutions

There are existing ways to accomplish this. For example, some libraries offer a WYSIWYG editor. Import a library like TinyMCE with a single and you’re good to go. WYSIWYG editors are powerful and support all kinds of formatting, even applying CSS classes to content for styling.

But TinyMCE isn’t the most efficient package at about 500 KB minified. That’s not a criticism as much as an indication of how much functionality it covers. We want something more “barebones” than that for our simple purpose. Searching GitHub surfaces more possibilities. The solutions, however, seem to fall into one of two categories:

  • The input accepts plain text, but the generated HTML only supports the HTML

    and

    tags.

  • The input converts plain text into formatted HTML, but by ”plain text,” the tool seems to mean “Markdown” (or a variety of it) instead. The txt2html Perl module (from 1994!) would fall under this category.

Even if a perfect solution for what we want was already out there, I’d still want to pick apart the concept of converting text to HTML to understand how it works and hopefully learn something new in the process. So, let’s proceed with our own homespun solution.

Setting Up The HTML

We’ll start with the HTML structure for the input and output. For the input element, we’re probably best off using a . For the output element and related styling, choices abound. The following is merely one example with some very basic CSS to place the input on the left and an output

on the right:

See the Pen [Base Form Styles [forked]](https://codepen.io/smashingmag/pen/OJGoNOX) by Geoff Graham.

See the Pen Base Form Styles [forked] by Geoff Graham.

You can further develop the CSS, but that isn’t the focus of this article. There is no question that the design can be prettier than what I am providing here!

Capture The Plain Text Input

We’ll set an onkeyup event handler on the to call a JavaScript function called convert() that does what it says: convert the plain text into HTML. The conversion function should accept one parameter, a string, for the user’s plain text input entered into the element:

onkeyup is a better choice than onkeydown in this case, as onkeyup will call the conversion function after the user completes each keystroke, as opposed to before it happens. This way, the output, which is refreshed with each keystroke, always includes the latest typed character. If the conversion is triggered with an onkeydown handler, the output will exclude the most recent character the user typed. This can be frustrating when, for example, the user has finished typing a sentence but cannot yet see the final punctuation mark, say a period (.), in the output until typing another character first. This creates the impression of a typo, glitch, or lag when there is none.

In JavaScript, the convert() function has the following responsibilities:

  1. Encode the input in HTML.
  2. Process the input line-by-line and wrap each individual line in either a

    or

    HTML tag, whichever is most appropriate.

  3. Process the output of the transformations as a single string, wrap URLs in HTML tags, and replace image file names with elements.

And from there, we display the output. We can create separate functions for each responsibility. Let’s name them accordingly:

  1. html_encode()
  2. convert_text_to_HTML()
  3. convert_images_and_links_to_HTML()

Each function accepts one parameter, a string, and returns a string.

Encoding The Input Into HTML

Use the html_encode() function to HTML encode/sanitize the input. HTML encoding refers to the process of escaping or replacing certain characters in a string input to prevent users from inserting their own HTML into the output. At a minimum, we should replace the following characters:

  • < with <
  • > with >
  • & with &
  • ' with '
  • " with "

JavaScript does not provide a built-in way to HTML encode input as other languages do. For example, PHP has htmlspecialchars(), htmlentities(), and strip_tags() functions. That said, it is relatively easy to write our own function that does this, which is what we’ll use the html_encode() function for that we defined earlier:

function html_encode(input) {
  const textArea = document.createElement("textarea");
  textArea.innerText = input;
  return textArea.innerHTML.split("
").join("n"); }

HTML encoding of the input is a critical security consideration. It prevents unwanted scripts or other HTML manipulations from getting injected into our work. Granted, front-end input sanitization and validation are both merely deterrents because bad actors can bypass them. But we may as well make them work a little harder.

As long as we are on the topic of securing our work, make sure to HTML-encode the input on the back end, where the user cannot interfere. At the same time, take care not to encode the input more than once. Encoding text that is already HTML-encoded will break the output functionality. The best approach for back-end storage is for the front end to pass the raw, unencoded input to the back end, then ask the back-end to HTML-encode the input before inserting it into a database.

That said, this only accounts for sanitizing and storing the input on the back end. We still have to display the encoded HTML output on the front end. There are at least two approaches to consider:

  1. Convert the input to HTML after HTML-encoding it and before it is inserted into a database.
    This is efficient, as the input only needs to be converted once. However, this is also an inflexible approach, as updating the HTML becomes difficult if the output requirements happen to change in the future.
  2. Store only the HTML-encoded input text in the database and dynamically convert it to HTML before displaying the output for each content request.
    This is less efficient, as the conversion will occur on each request. However, it is also more flexible since it’s possible to update how the input text is converted to HTML if requirements change.

Applying Semantic HTML Tags

Let’s use the convert_text_to_HTML() function we defined earlier to wrap each line in their respective HTML tags, which are going to be either

or

. To determine which tag to use, we will split the text input on the newline character (n) so that the text is processed as an array of lines rather than a single string, allowing us to evaluate them individually.

function convert_text_to_HTML(txt) {
  // Output variable
  let out = '';
  // Split text at the newline character into an array
  const txt_array = txt.split("n");
  // Get the number of lines in the array
  const txt_array_length = txt_array.length;
  // Variable to keep track of the (non-blank) line number
  let non_blank_line_count = 0;
  
  for (let i = 0; i < txt_array_length; i++) {
    // Get the current line
    const line = txt_array[i];
    // Continue if a line contains no text characters
    if (line === ''){
      continue;
    }
    
    non_blank_line_count++;
    // If a line is the first line that contains text
    if (non_blank_line_count === 1){
      // ...wrap the line of text in a Heading 1 tag
      out += `

${line}

`; // ...otherwise, wrap the line of text in a Paragraph tag. } else { out += `

${line}

`; } } return out; }

In short, this little snippet loops through the array of split text lines and ignores lines that do not contain any text characters. From there, we can evaluate whether a line is the first one in the series. If it is, we slap a

tag on it; otherwise, we mark it up in a

tag.

This logic could be used to account for other types of elements that you may want to include in the output. For example, perhaps the second line is assumed to be a byline that names the author and links up to an archive of all author posts.

Tagging URLs And Images With Regular Expressions

Next, we’re going to create our convert_images_and_links_to_HTML() function to encode URLs and images as HTML elements. It’s a good chunk of code, so I’ll drop it in and we’ll immediately start picking it apart together to explain how it all works.


function convert_images_and_links_to_HTML(string){
  let urls_unique = [];
  let images_unique = [];
  const urls = string.match(/https*://[^s<),]+[^ss]+.(jpg|jpeg|gif|png|webp)/gmi) ?? [];
                          
  const urls_length = urls.length;
  const images_length = imgs.length;
  
  for (let i = 0; i < urls_length; i++){
    const url = urls[i];
    if (!urls_unique.includes(url)){
      urls_unique.push(url);
    }
  }
  
  for (let i = 0; i < images_length; i++){
    const img = imgs[i];
    if (!images_unique.includes(img)){
      images_unique.push(img);
    }
  }
  
  const urls_unique_length = urls_unique.length;
  const images_unique_length = images_unique.length;
  
  for (let i = 0; i < urls_unique_length; i++){
    const url = urls_unique[i];
    if (images_unique_length === 0 || !images_unique.includes(url)){
      const a_tag = `${url}`;
      string = string.replace(url, a_tag);
    }
  }
  
  for (let i = 0; i < images_unique_length; i++){
    const img = images_unique[i];
    const img_tag = ``;
    const img_link = `${img_tag}`;
    string = string.replace(img, img_link);
  }
  return string;
}

Unlike the convert_text_to_HTML() function, here we use regular expressions to identify the terms that need to be wrapped and/or replaced with or tags. We do this for a couple of reasons:

  1. The previous convert_text_to_HTML() function handles text that would be transformed to the HTML block-level elements

    and

    , and, if you want, other block-level elements such as

    . Block-level elements in the HTML output correspond to discrete lines of text in the input, which you can think of as paragraphs, the text entered between presses of the Enter key.

  2. On the other hand, URLs in the text input are often included in the middle of a sentence rather than on a separate line. Images that occur in the input text are often included on a separate line, but not always. While you could identify text that represents URLs and images by processing the input line-by-line — or even word-by-word, if necessary — it is easier to use regular expressions and process the entire input as a single string rather than by individual lines.

Regular expressions, though they are powerful and the appropriate tool to use for this job, come with a performance cost, which is another reason to use each expression only once for the entire text input.

Remember: All the JavaScript in this example runs each time the user types a character, so it is important to keep things as lightweight and efficient as possible.

I also want to make a note about the variable names in our convert_images_and_links_to_HTML() function. images (plural), image (singular), and link are reserved words in JavaScript. Consequently, imgs, img, and a_tag were used for naming. Interestingly, these specific reserved words are not listed on the relevant MDN page, but they are on W3Schools.

We’re using the String.prototype.match() function for each of the two regular expressions, then storing the results for each call in an array. From there, we use the nullish coalescing operator (??) on each call so that, if no matches are found, the result will be an empty array. If we do not do this and no matches are found, the result of each match() call will be null and will cause problems downstream.

const urls = string.match(/https*://[^s<),]+[^ss]+.(jpg|jpeg|gif|png|webp)/gmi) ?? [];

Next up, we filter the arrays of results so that each array contains only unique results. This is a critical step. If we don’t filter out duplicate results and the input text contains multiple instances of the same URL or image file name, then we break the HTML tags in the output. JavaScript does not provide a simple, built-in method to get unique items in an array that’s akin to the PHP array_unique() function.

The code snippet works around this limitation using an admittedly ugly but straightforward procedural approach. The same problem is solved using a more functional approach if you prefer. There are many articles on the web describing various ways to filter a JavaScript array in order to keep only the unique items.

We’re also checking if the URL is matched as an image before replacing a URL with an appropriate tag and performing the replacement only if the URL doesn’t match an image. We may be able to avoid having to perform this check by using a more intricate regular expression. The example code deliberately uses regular expressions that are perhaps less precise but hopefully easier to understand in an effort to keep things as simple as possible.

And, finally, we’re replacing image file names in the input text with tags that have the src attribute set to the image file name. For example, my_image.png in the input is transformed into in the output. We wrap each tag with an tag that links to the image file and opens it in a new tab when clicked.

There are a couple of benefits to this approach:

  • In a real-world scenario, you will likely use a CSS rule to constrain the size of the rendered image. By making the images clickable, you provide users with a convenient way to view the full-size image.
  • If the image is not a local file but is instead a URL to an image from a third party, this is a way to implicitly provide attribution. Ideally, you should not rely solely on this method but, instead, provide explicit attribution underneath the image in a
    , , or similar element. But if, for whatever reason, you are unable to provide explicit attribution, you are at least providing a link to the image source.

It may go without saying, but “hotlinking” images is something to avoid. Use only locally hosted images wherever possible, and provide attribution if you do not hold the copyright for them.

Before we move on to displaying the converted output, let’s talk a bit about accessibility, specifically the image alt attribute. The example code I provided does add an alt attribute in the conversion but does not populate it with a value, as there is no easy way to automatically calculate what that value should be. An empty alt attribute can be acceptable if the image is considered “decorative,” i.e., purely supplementary to the surrounding text. But one may argue that there is no such thing as a purely decorative image.

That said, I consider this to be a limitation of what we’re building.

Displaying the Output HTML

We’re at the point where we can finally work on displaying the HTML-encoded output! We’ve already handled all the work of converting the text, so all we really need to do now is call it:

function convert(input_string) {
  output.innerHTML = convert_images_and_links_to_HTML(convert_text_to_HTML(html_encode(input_string)));
}

If you would rather display the output string as raw HTML markup, use a

tag as the output element instead of a

:

The only thing to note about this approach is that you would target the

element’s textContent instead of innerHTML:

function convert(input_string) {
  output.textContent = convert_images_and_links_to_HTML(convert_text_to_HTML(html_encode(input_string)));
}

Conclusion

We did it! We built one of the same sort of copy-paste tool that converts plain text on the spot. In this case, we’ve configured it so that plain text entered into a is parsed line-by-line and encoded into HTML that we format and display inside another element.

See the Pen [Convert Plain Text to HTML (PoC) [forked]](https://codepen.io/smashingmag/pen/yLrxOzP) by Geoff Graham.

See the Pen Convert Plain Text to HTML (PoC) [forked] by Geoff Graham.

We were even able to keep the solution fairly simple, i.e., vanilla HTML, CSS, and JavaScript, without reaching for a third-party library or framework. Does this simple solution do everything a ready-made tool like a framework can do? Absolutely not. But a solution as simple as this is often all you need: nothing more and nothing less.

As far as scaling this further, the code could be modified to POST what’s entered into the using a PHP script or the like. That would be a great exercise, and if you do it, please share your work with me in the comments because I’d love to check it out.

References

Smashing Editorial
(gg, yk)